By: Team T16-3 Since: Oct 2018 Licence: MIT
- 1. Setting up
- 2. Design
- 3. Implementation
- 4. Documentation
- 5. Testing
- 6. Dev Ops
- Appendix A: Suggested Programming Tasks to Get Started
- Appendix B: Product Scope
- Appendix C: User Stories
- Appendix D: Use Cases
- Appendix E: Non Functional Requirements
- Appendix F: Glossary
- Appendix G: Product Survey
- Appendix H: Instructions for Manual Testing
- H.1. Launch and Shutdown
- H.2. Login into account
- H.3. Sign up for an account
- H.4. Adding an Order
- H.5. Selecting order
- H.6. Finding orders
- H.7. Editing an order
- H.8. Deleting an order
- H.9. Mark an order as Completed
- H.10. Assigning orders to a deliveryman
- H.11. Adding deliveryman
- H.12. Deleting deliveryman
- H.13. Selecting deliveryman
- H.14. Finding deliveryman
1. Setting up
1.1. Prerequisites
-
JDK
9or laterJDK 10on Windows will fail to run tests in headless mode due to a JavaFX bug. Windows developers are highly recommended to use JDK9. -
IntelliJ IDE
IntelliJ by default has Gradle and JavaFx plugins installed.
Do not disable them. If you have disabled them, go toFile>Settings>Pluginsto re-enable them.
1.2. Setting up the project in your computer
-
Fork this repo, and clone the fork to your computer
-
Open IntelliJ (if you are not in the welcome screen, click
File>Close Projectto close the existing project dialog first) -
Set up the correct JDK version for Gradle
-
Click
Configure>Project Defaults>Project Structure -
Click
New…and find the directory of the JDK
-
-
Click
Import Project -
Locate the
build.gradlefile and select it. ClickOK -
Click
Open as Project -
Click
OKto accept the default settings -
Open a console and run the command
gradlew processResources(Mac/Linux:./gradlew processResources). It should finish with theBUILD SUCCESSFULmessage.
This will generate all resources required by the application and tests.
1.3. Verifying the setup
-
Run the
seedu.address.MainAppand try a few commands -
Run the tests to ensure they all pass.
1.4. Configurations to do before writing code
1.4.1. Configuring the coding style
This project follows oss-generic coding standards. IntelliJ’s default style is mostly compliant with ours but it uses a different import order from ours. To rectify,
-
Go to
File>Settings…(Windows/Linux), orIntelliJ IDEA>Preferences…(macOS) -
Select
Editor>Code Style>Java -
Click on the
Importstab to set the order-
For
Class count to use import with '*'andNames count to use static import with '*': Set to999to prevent IntelliJ from contracting the import statements -
For
Import Layout: The order isimport static all other imports,import java.*,import javax.*,import org.*,import com.*,import all other imports. Add a<blank line>between eachimport
-
Optionally, you can follow the UsingCheckstyle.adoc document to configure Intellij to check style-compliance as you write code.
1.4.2. Updating documentation to match your fork
After forking the repo, the documentation will still have the SE-EDU branding and refer to the se-edu/addressbook-level4 repo.
If you plan to develop this fork as a separate product (i.e. instead of contributing to se-edu/addressbook-level4), you should do the following:
-
Configure the site-wide documentation settings in
build.gradle, such as thesite-name, to suit your own project. -
Replace the URL in the attribute
repoURLinDeveloperGuide.adocandUserGuide.adocwith the URL of your fork.
1.4.3. Setting up CI
Set up Travis to perform Continuous Integration (CI) for your fork. See UsingTravis.adoc to learn how to set it up.
After setting up Travis, you can optionally set up coverage reporting for your team fork (see UsingCoveralls.adoc).
| Coverage reporting could be useful for a team repository that hosts the final version but it is not that useful for your personal fork. |
Optionally, you can set up AppVeyor as a second CI (see UsingAppVeyor.adoc).
| Having both Travis and AppVeyor ensures your App works on both Unix-based platforms and Windows-based platforms (Travis is Unix-based and AppVeyor is Windows-based) |
1.4.4. Getting started with coding
When you are ready to start coding,
-
Get some sense of the overall design by reading [Design-Architecture].
-
Take a look at Appendix A, Suggested Programming Tasks to Get Started.
2. Design
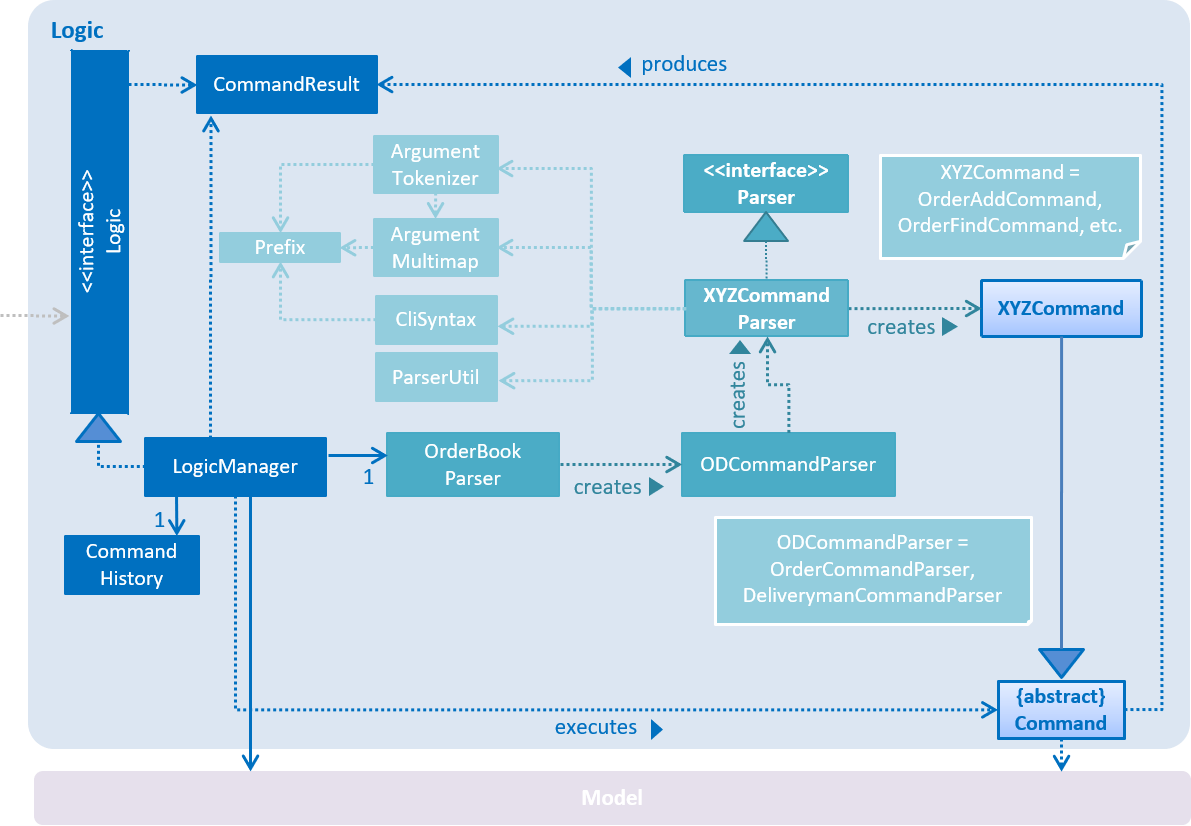
2.1. Architecture

The Architecture Diagram given above explains the high-level design of the App. Given below is a quick overview of each component.
The .pptx files used to create diagrams in this document can be found in the diagrams folder. To update a diagram, modify the diagram in the pptx file, select the objects of the diagram, and choose Save as picture.
|
Main has only one class called MainApp. It is responsible for,
-
At app launch: Initializes the components in the correct sequence, and connects them up with each other.
-
At shut down: Shuts down the components and invokes cleanup method where necessary.
Commons represents a collection of classes used by multiple other components. Two of those classes play important roles at the architecture level.
-
EventsCenter: This class (written using Google’s Event Bus library) is used by components to communicate with other components using events (i.e. a form of Event Driven design) -
LogsCenter: Used by many classes to write log messages to the App’s log file.
The rest of the App consists of four components.
Each of the four components
-
Defines its API in an
interfacewith the same name as the Component. -
Exposes its functionality using a
{Component Name}Managerclass.
For example, the Logic component (see the class diagram given below) defines it’s API in the Logic.java interface and exposes its functionality using the LogicManager.java class.
Events-Driven nature of the design
The Sequence Diagram below shows how the components interact for the scenario where the user issues the command /order delete 1.
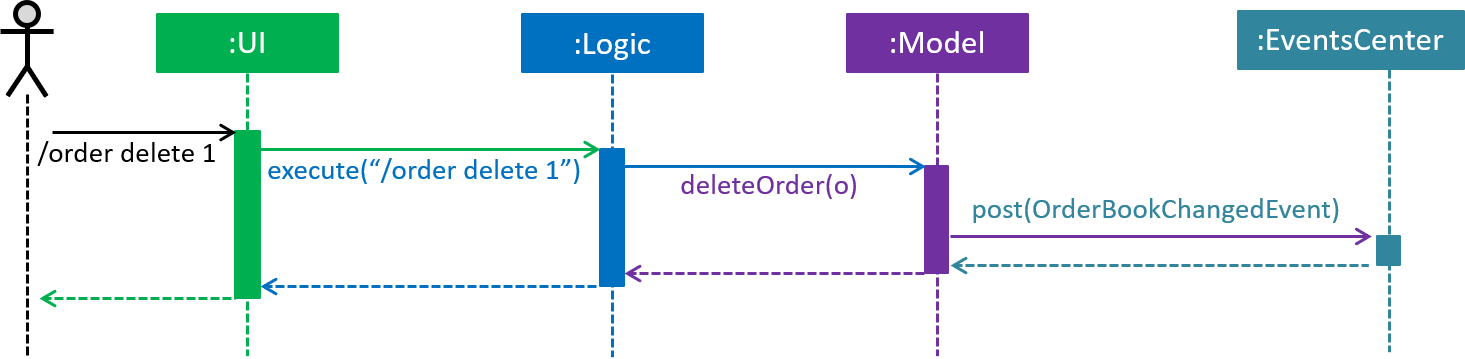
/order delete 1 command (part 1)
Note how the Model simply raises a OrderBookChangedEvent when the Order Book data are changed, instead of asking the Storage to save the updates to the hard disk.
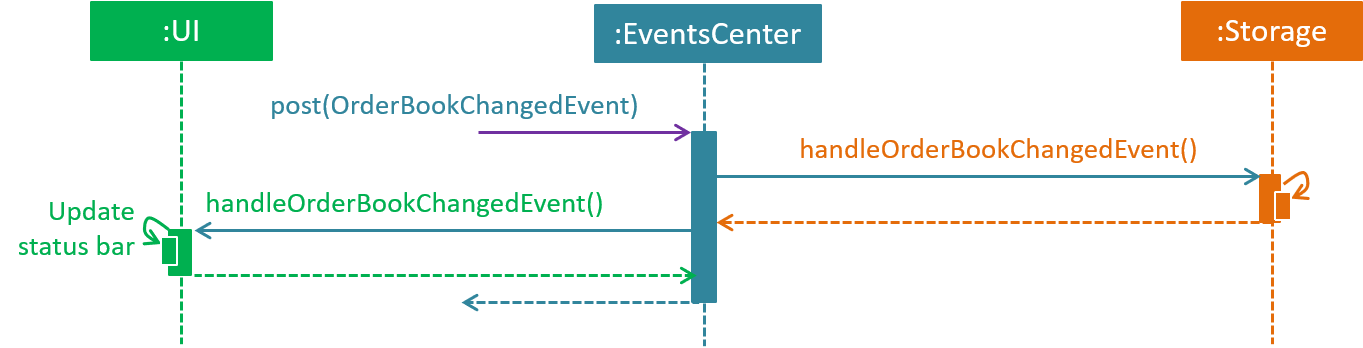
|
The diagram below shows how the EventsCenter reacts to that event, which eventually results in the updates being saved to the hard disk and the status bar of the UI being updated to reflect the 'Last Updated' time.
/order delete 1 command (part 2)
Note how the event is propagated through the EventsCenter to the Storage and UI without Model having to be coupled to either of them. This is an example of how this Event Driven approach helps us reduce direct coupling between components.
|
The sections below give more details of each component.
2.2. UI component
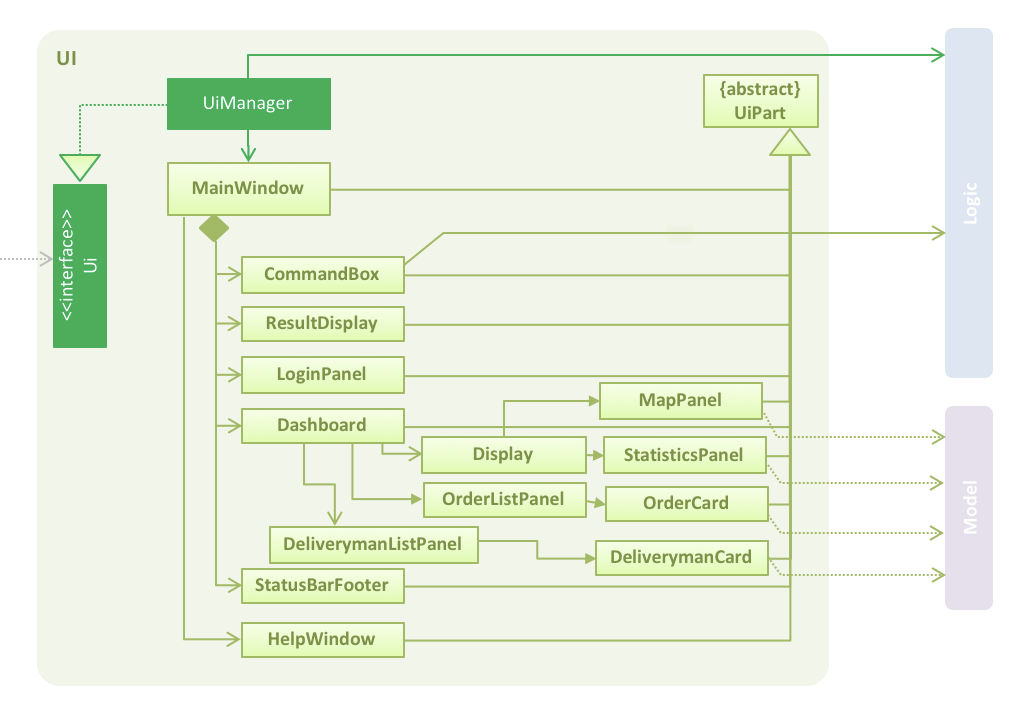
API : Ui.java
The UI consists of a MainWindow that is made up of parts e.g.CommandBox, ResultDisplay, OrderListPanel,
StatusBarFooter, Dashboard etc. All these, including the MainWindow, inherit from the abstract UiPart class.
The UI component uses JavaFx UI framework. The layout of these UI parts are defined in matching .fxml files that are in the src/main/resources/view folder. For example, the layout of the MainWindow is specified in MainWindow.fxml
The UI component,
-
Executes user commands using the
Logiccomponent. -
Binds itself to some data in the
Modelso that the UI can auto-update when data in theModelchange. -
Responds to events raised from various parts of the App and updates the UI accordingly.
2.3. Logic component
API :
Logic.java
-
Logicuses theOrderBookParserclass to parse the user command. -
OrderBookParserfurther creates either aOrderCommandParserorDeliverymanCommandParserto parse order or deliveryman command respectively. Other commands that is neither order or deliveryman skip this creation of the extra Parser. -
This results in a
Commandobject which is executed by theLogicManager. -
The command execution can affect the
Model(e.g. adding an order) and/or raise events. -
The result of the command execution is encapsulated as a
CommandResultobject which is passed back to theUi.
Given below is the Sequence Diagram for interactions within the Logic component for the execute("/order delete 1") API call.

/order delete 1 Command2.4. Model component
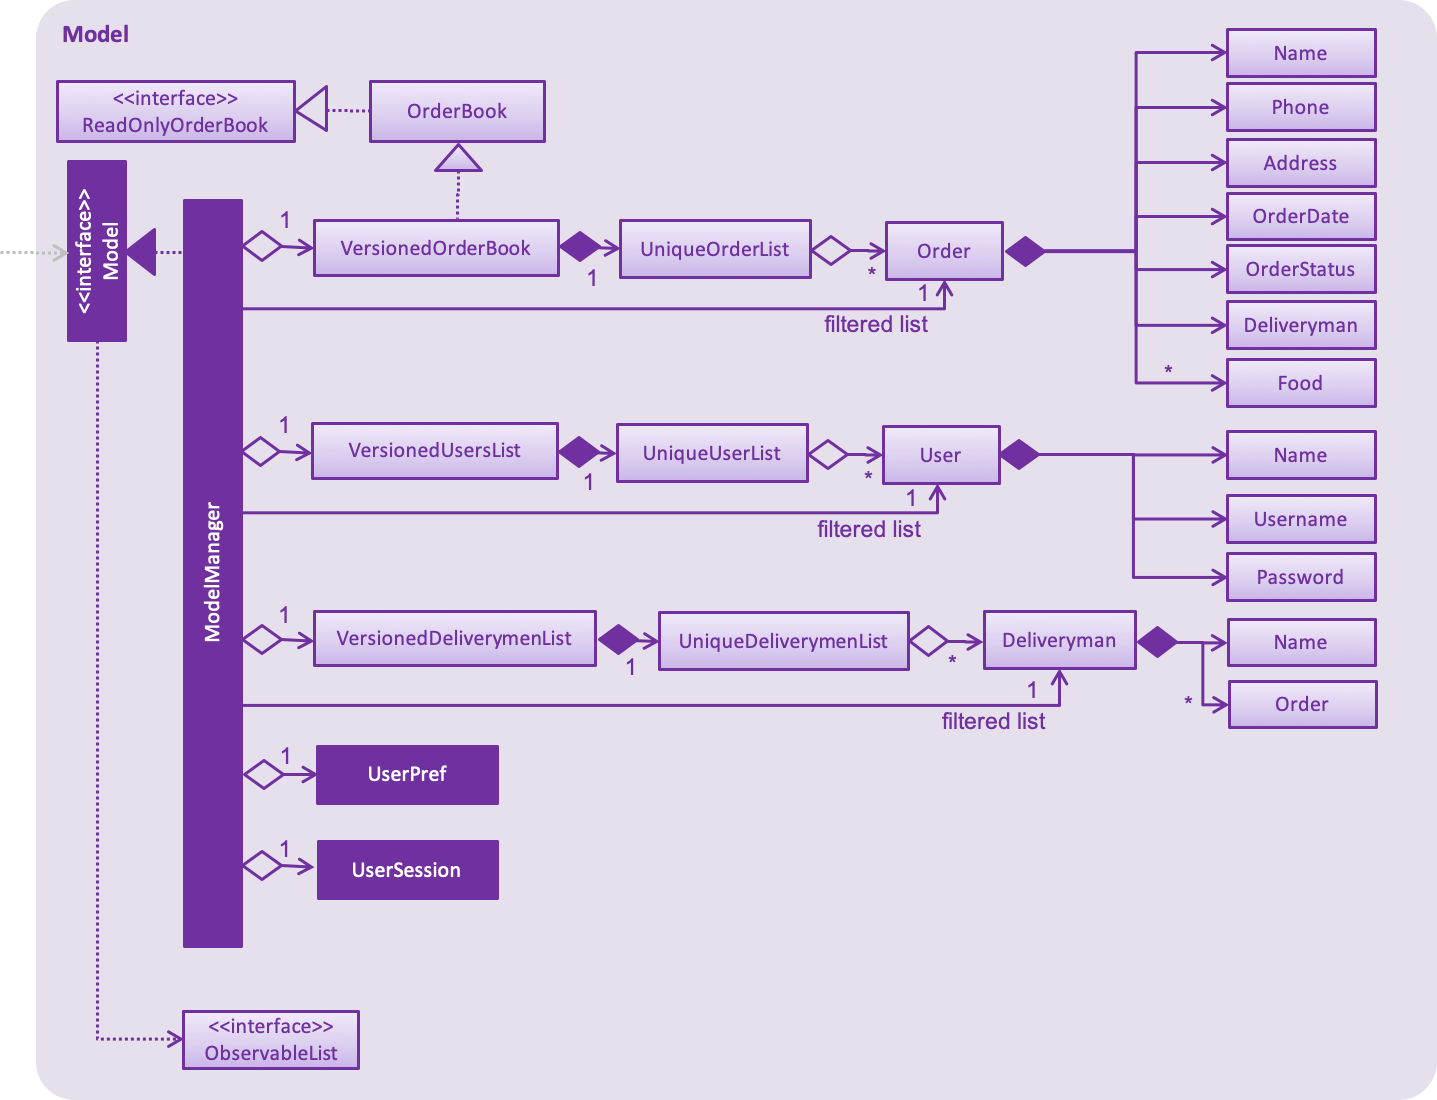
API : Model.java
The Model,
-
stores a
UserPrefobject that represents the user’s preferences. -
stores the Order data.
-
stores the Users data.
-
stores the Deliveryman data.
-
stores a
UserSessionobject that represents the user’s login session. -
exposes an unmodifiable
ObservableList<Order>that can be 'observed' e.g. the UI can be bound to this list so that the UI automatically updates when the data in the list change. -
exposes an unmodifiable
ObservableList<Deliveryman>that can be 'observed' e.g. the UI can be bound to this list so that the UI automatically updates when the data in the list change. -
does not depend on any of the other three components.
2.5. Storage component
The following diagram shows how the Storage component is structured.
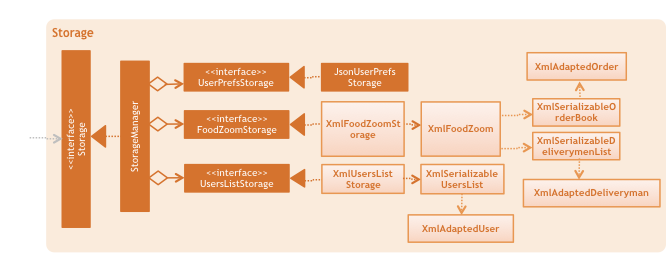
API : Storage.java
The Storage component,
-
can save
UserPrefobjects in json format and read it back. -
can save the FoodZoom data in xml format and read it back.
-
FoodZoom allows deliverymen and users to be stored separately to prevent duplication of data while retaining object associations.
-
-
can save the Users' data in xml format and read it back.
The following diagram depicts the sequence diagram of how StorageManager saves changes every time a change is made
in FoodZoom.
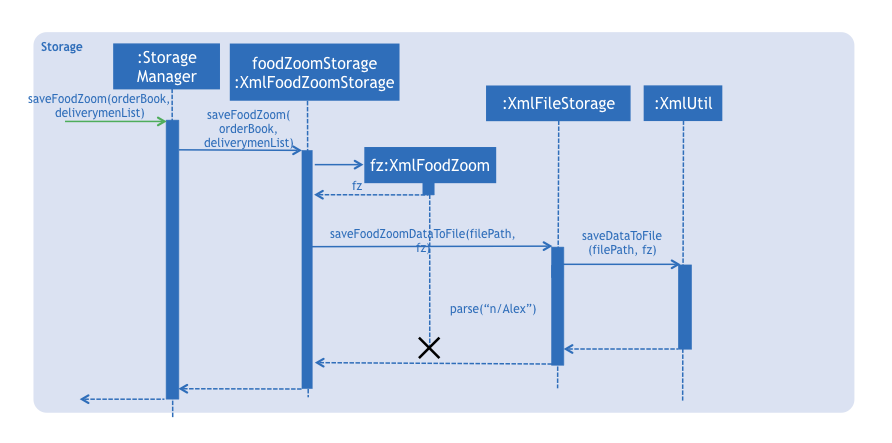
ModelManager.saveFoodZoom(orderBook, deliverymenList) is called.2.5.1. Design considerations
Aspect: Implementation of file storage structure for FoodZoom
This concerns the implementation of how application data is stored in a reloadable file.
-
Alternative 1: Use two separate files for the storage of FoodZoom data
-
Pros:
-
This solution presents a better separation of concerns between deliverymen and orders. This means that corruption of one file would not affect the other.
-
-
Cons:
-
It is more difficult to manage JXML marshalling from two separate files.
-
-
-
Alternative 2 (current choice): Use a single file to the storage of
deliverymenandorders-
Pros:
-
Coupling of
deliverymenandordersallows more cohesion, as information likeidfor a deliveryman’s orders would be unusable without knowing the orders.
-
-
Cons:
-
Corruption of one file would mean corruption of all application data.
-
-
2.6. Common classes
Classes used by multiple components are in the seedu.addressbook.commons package.
3. Implementation
This section describes some noteworthy details on how certain features are implemented.
3.1. Login Command
3.1.1. Current Implementation
The /login command allows the Manager to login into the FoodZoom application and use authenticated commands like
/order add, /order edit, /order list, … .Basically all the /order commands and /deliveryman commands. The
only commands that can be used without logging in are /signup, /login, /help and /history. The format of this
command is /login u/[USERNAME] pw/[PASSWORD].
In our current implementation, the /login command inherits from Command class. 2 components, Logic and Model
are involved in the execution of this command. The Logic class is responsible for parsing the user input and the
Model class deals with storing the UserSession and checking if the user is logged in or not.
Below is a sequence diagram that illustrates how these 2 components interact when the /login command is executed:
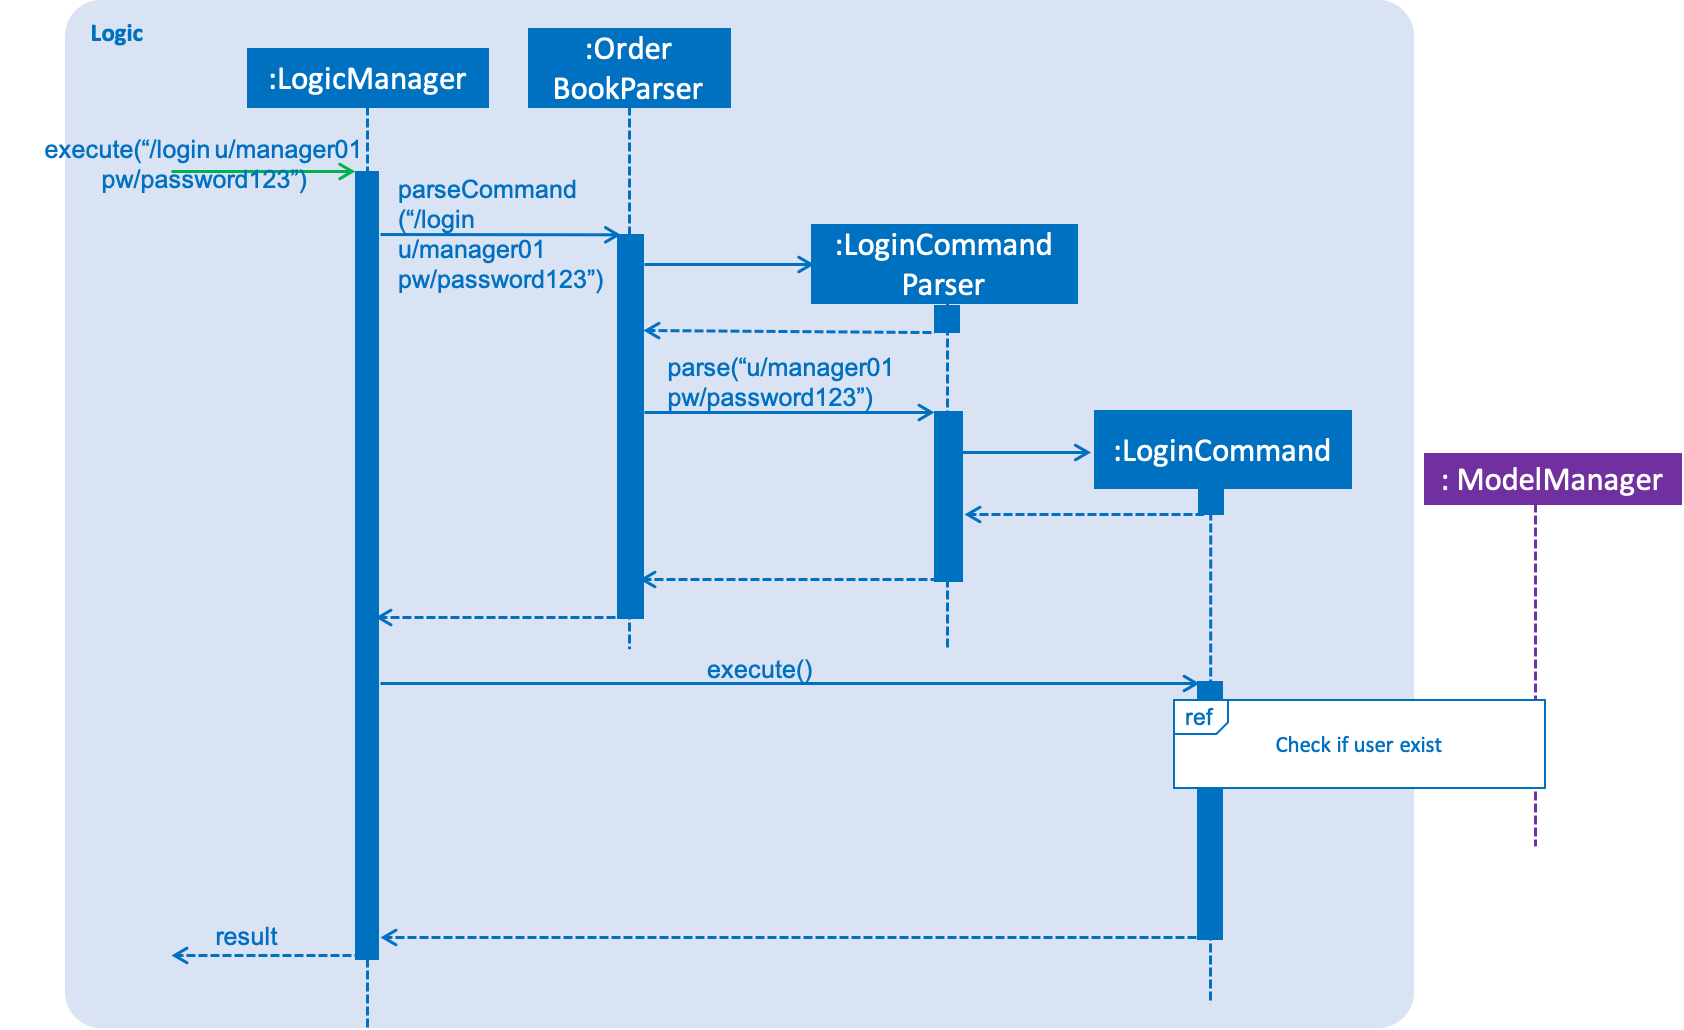
Figure 3.1.1.1 Sequence diagram to illustrate Logic component interactions for /login.

Figure 3.1.1.2 Sequence diagram to illustrate Logic and Model component interactions for /login.
As shown above, execution of the /login command comprises of the following steps:
-
LogicManagerinvokes theparseCommandmethod ofOrderBookParser, taking in user inputs as arguments. -
During the
parseCommandmethod call, an instance ofLoginCommandParserwill be created with the keyword/loginis matched.LoginCommandParserthen extracts the remaining user inputs and aLoginCommandinstance will be returned provided that the user’s input is correct. -
LoginCommandthen invokesisRegisteredUsermethod which belongs toModelManagerclass. TheModelManagerwill the invokeIsRegisteredUsermethod inUsersListto check if the user is in the list of users. -
After checking if the user is in the list, if it returns
truethenstoreUserInSessionmethod will be invoked to store theUserobject insideUserSession. Theexecutemethod will then return aCommandResultwith success login message. -
If the user is not in the list,
executemethod will just return aCommandResultwith failure to login message.
3.1.2. Design Considerations
Aspect: How /login executes
-
Alternative 1 (current choice): Check if user is in users list.
-
Pros: Easy to implement.
-
Cons: Not necessary to implement users list because there will only be 1 user.
-
-
Alternative 2: Automatic login even after application is opened more than once.
-
Pros: User do not need to login multiple times after application is re-opened.
-
Cons: Difficult to implement because it requires caching user details locally.
-
Aspect: Data Structure to support /login command
-
Alternative 1 (current choice): Create a unique user list to store all the user and create a
users.xmlto store locally.-
Pros: Easy to implement and you can make sure that there is only unique users.
-
Cons: Not necessary because there would only be 1 user using the application.
-
-
Alternative 2: Store user session inside
Userclass-
Pros: Easy to handle login session.
-
Cons: Would break the SRP (Single Responsibility Principle) because
Userclass should only be about the user and nothing to do with login at all.
-
Aspect: Checking if user is logged in
-
Alternative 1 (current choice): Check if user is logged in after command is parsed
-
Pros: It is easy to implement and it doesn’t violate the SRP because it wouldn’t make sense to check if the user is logged in inside a method that is supposed to be parsing the user input.
-
Cons: User is able to type authenticated commands like
/order addand receive a parse exception which is the incorrect behavior.
-
-
Alternative 2: Check if user is logged in before command is parsed
-
Pros: It is easy to implement.
-
Cons: It breaks the SRP because
parseCommandmethod should only be used to parse commands and not check for user logged in status.
-
3.2. Dashboard
3.2.1. Current Implementation
The dashboard for this application is the main screen that the user first sees when he or she logs into the application. It looks like this:
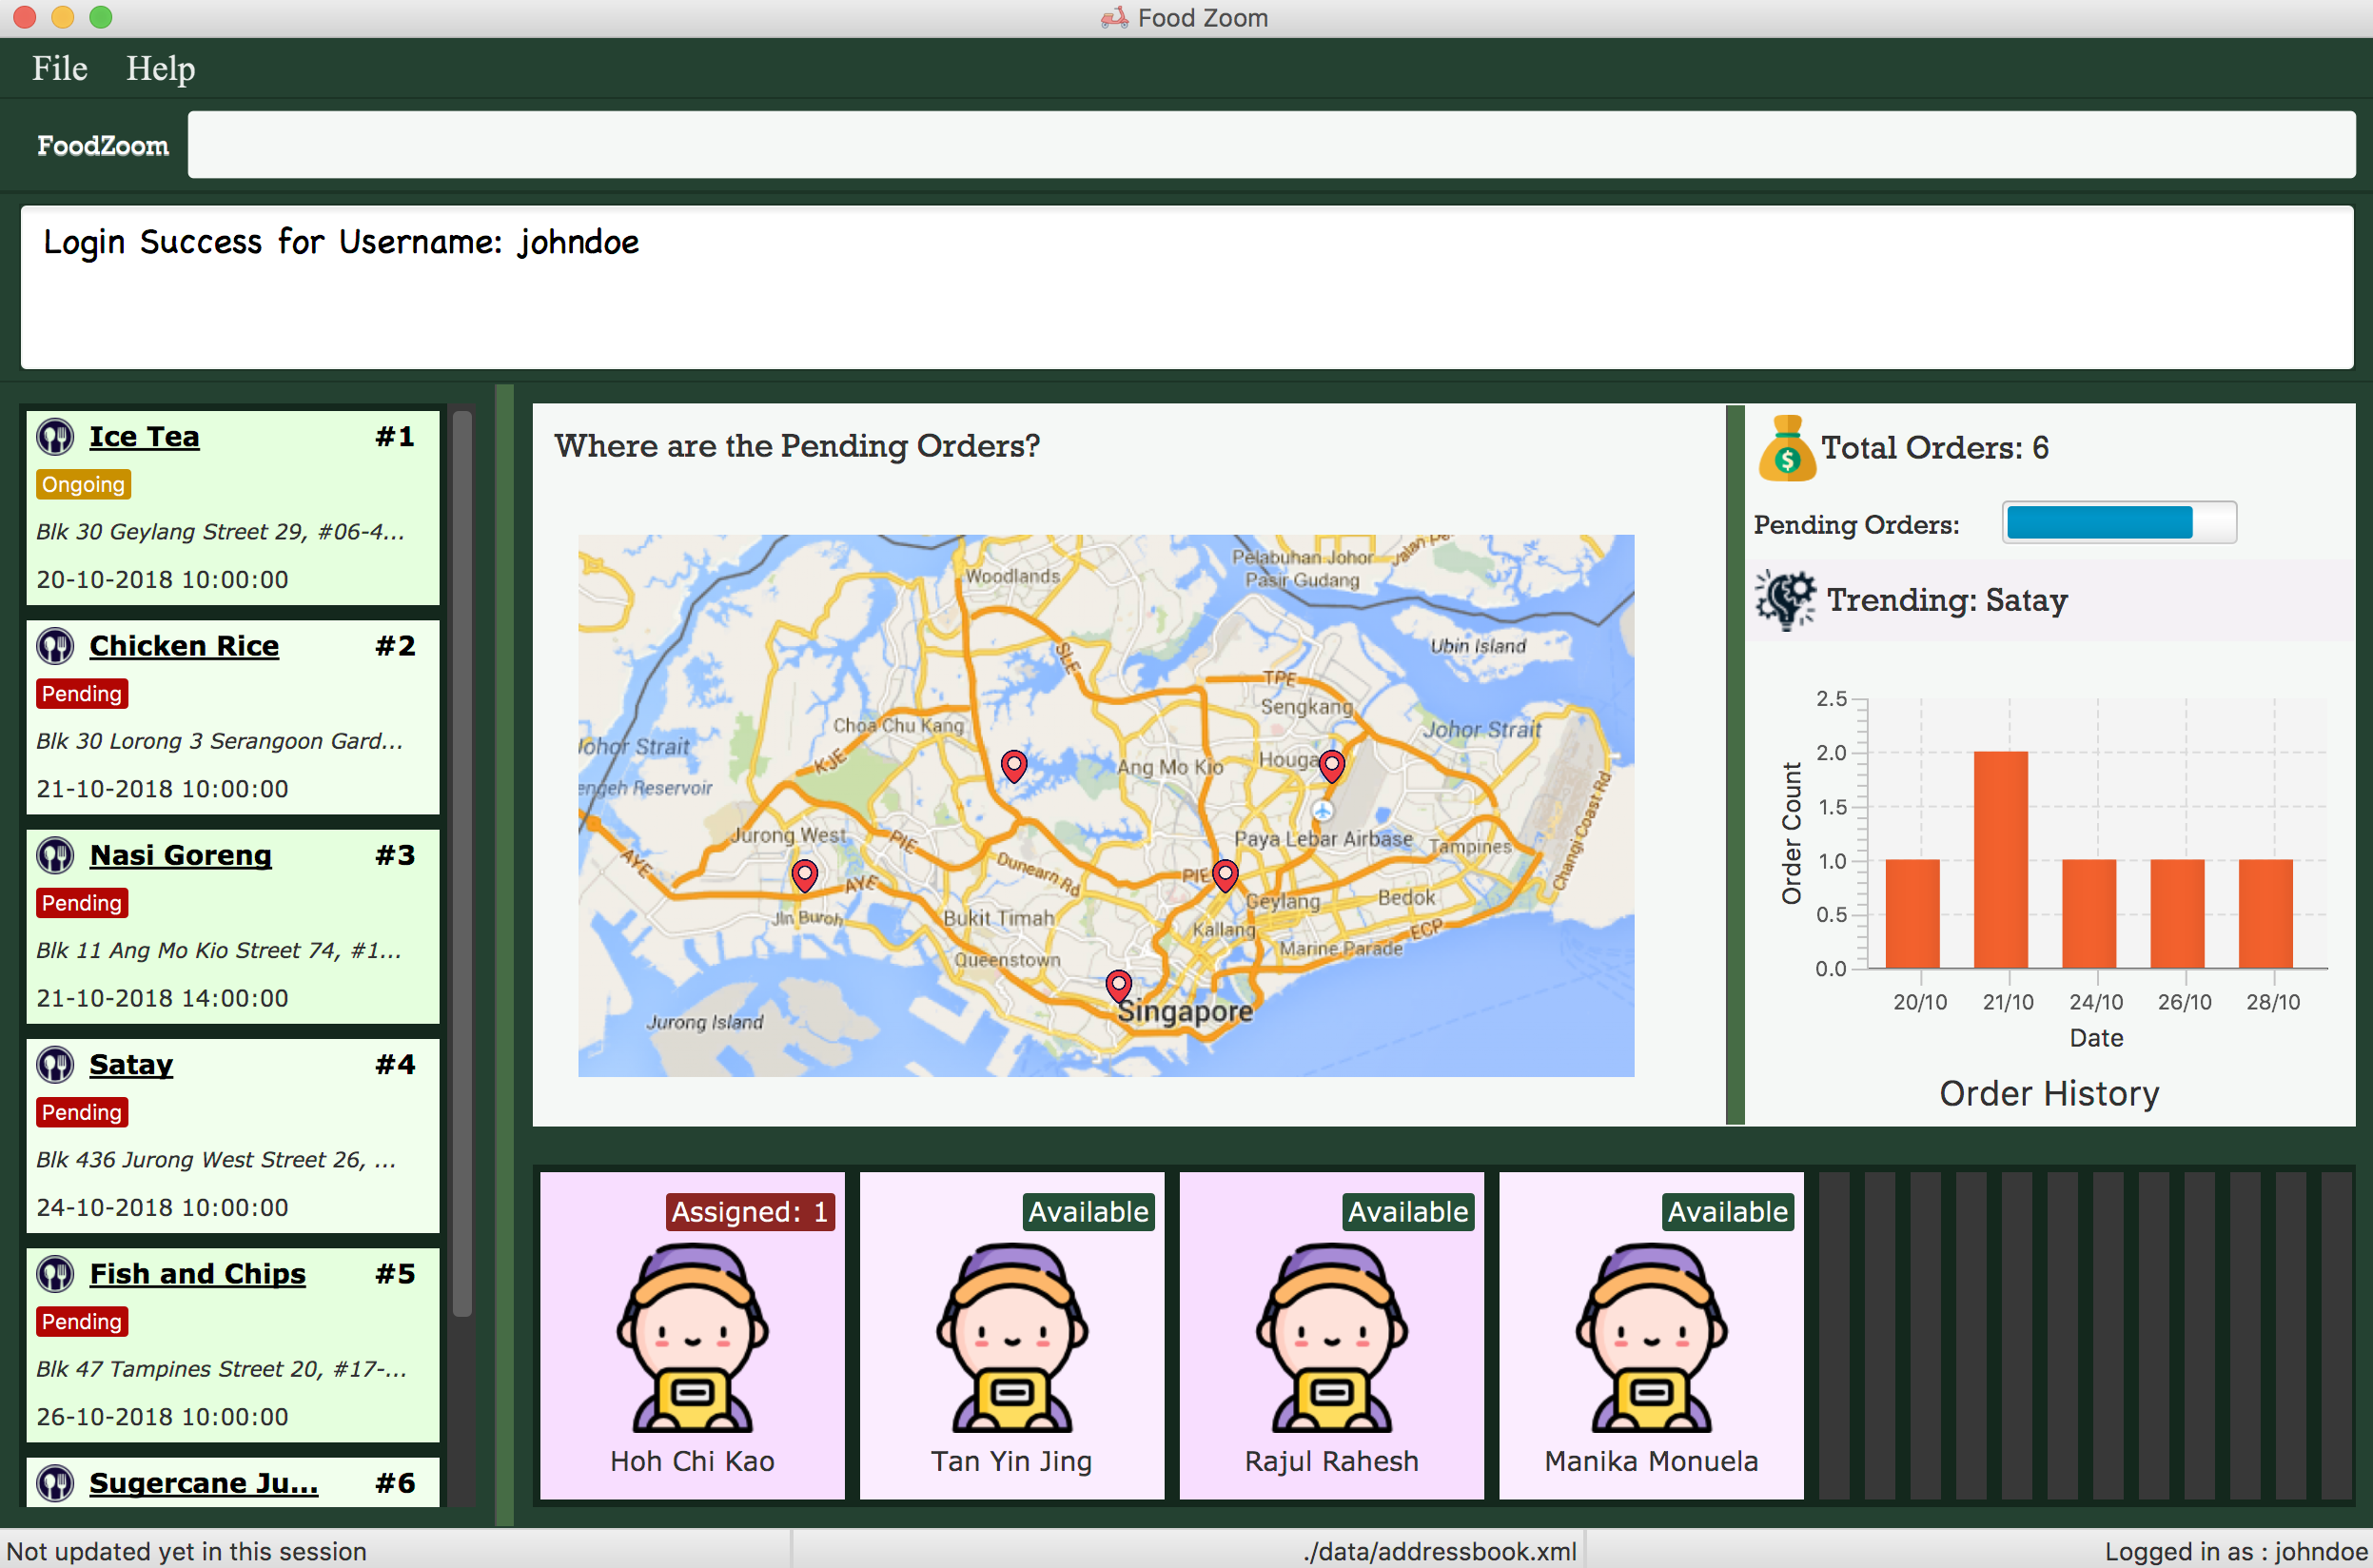
Figure 3.2.1.1 Main Screen showing the dashboard with the Map and Statistics Panel
The 2 main components in the dashboard are the:
-
Map showing location of pending orders
-
Statistics Panel giving insights for the data
Before delving into the details for these specific components, it is important to consider some of the implementation details that are common to both.
The dashboard dynamically updates itself when the order list has been changed. For example,
if /order find n/john is executed, the dashboard will also show orders that are specific
to john.
This is done by using the observer pattern. A higher-level component, Display.java listens for
changes and renders the user interface for the dashboard screen. This component attaches
a listener to the Observable List of Orders. The following activity diagram summarize
what happens inside the Display Component when a user executes a new command:
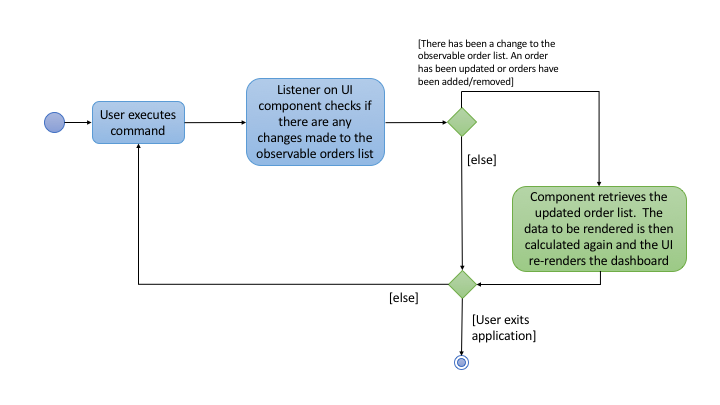
Figure 3.2.1.1 Activity Diagram showing what happens inside the Display component when a user
executes a command
The code snippet for the listener being attached is shown below:
this.orderList.addListener((ListChangeListener.Change<? extends Order> change) -> {
    while (change.next()) {
        if (change.wasUpdated()) {
            // handle order list being updated
            ....
        } else {
            // handle removal or addition to order list
            ....
        }
    }
});
Through this, the Display component is able to control the flow of the dashboard. It is responsible for
rendering the Map and Statistics components along with passing in the data that
they need. The data to be passed in has to be processed into a specific format so that
they can be easily rendered. The next two subsections in 3.2 would elaborate on how this
data processing is done.
3.2.2. Map Component
The Map shows the locations of the pending orders.
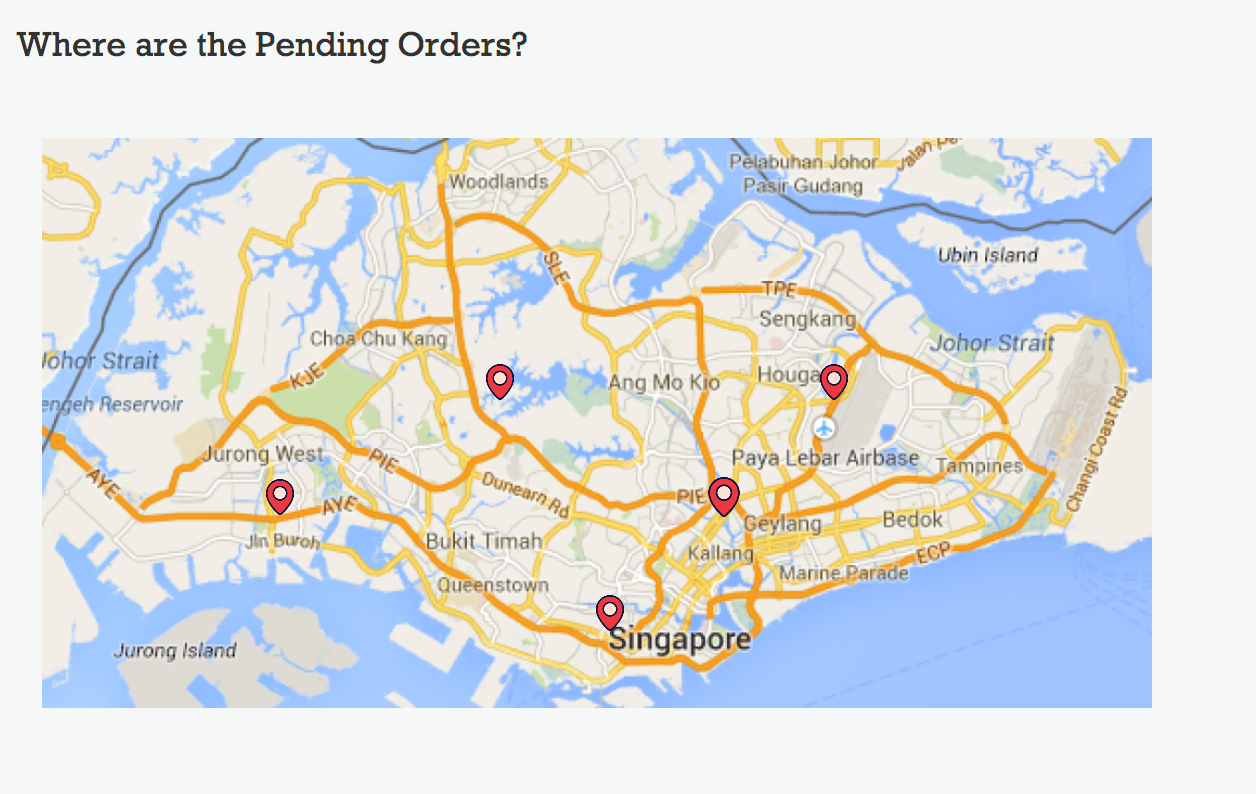
Figure 3.2.2.1 A closer look at the Map on the dashboard.
The functionality that the map provides is as follows:
-
It works offline and does not require internet. There is no reliance on any external service like Google Maps
-
Placeholders are rendered based on the location of Order given
-
The size of the placeholder is indicative of the number of orders in a specific area.
In order to work offline, the map makes use of the postal code that is given with the order address to give a reasonable approximation of its location in Singapore. The reason this can be done is because the first 2 digits of a Singapore postal code refers to a specific district in Singapore. The demarcation diagram is show below:
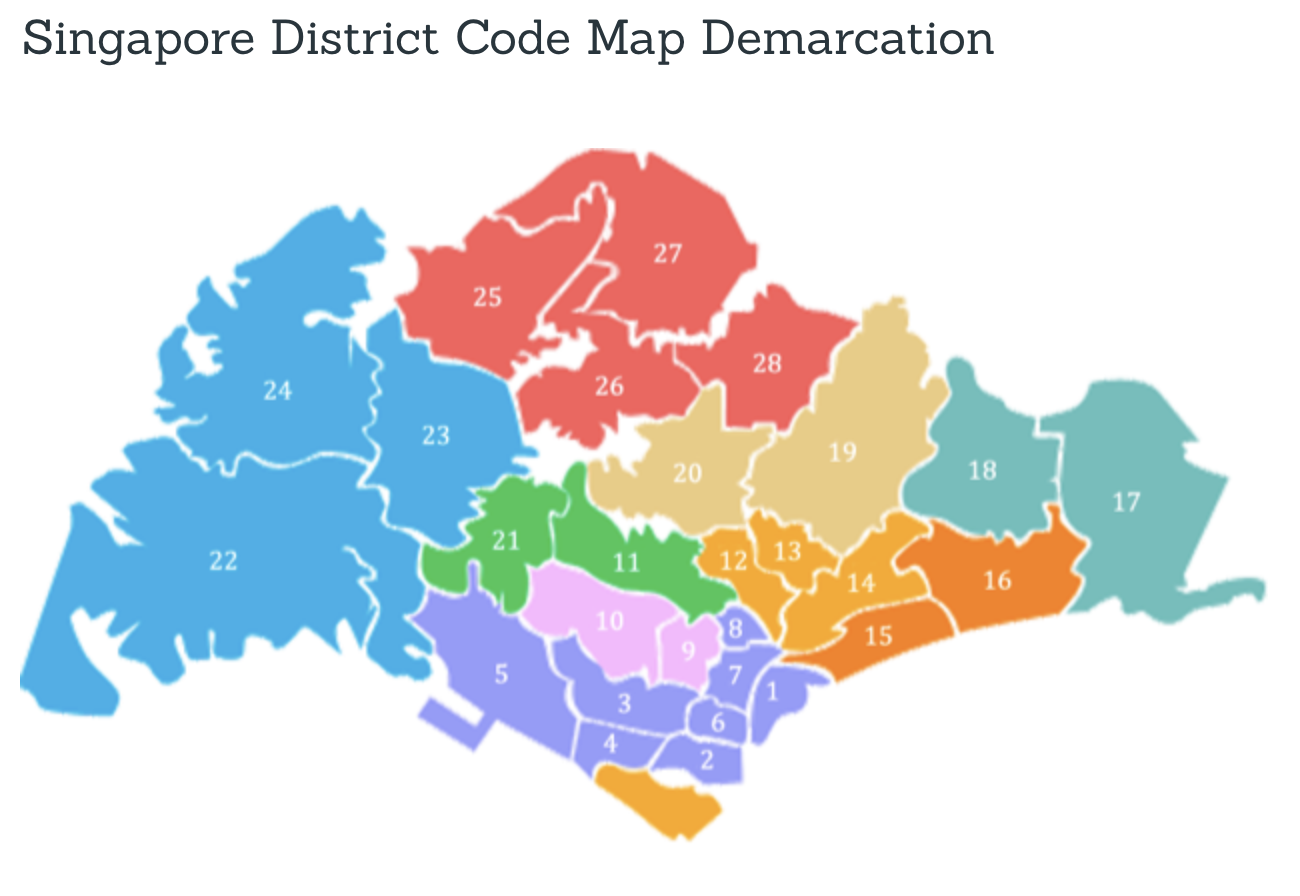
Figure 3.2.1.2 Diagram to illustrate how the regions are split up in Singapore. Each of the regions above corresponds to a specifc postal code tag
For example, if the first 2 digits of the given postal code is "61", the Order falls under district 22 (with reference to the image above). If the first 2 digits are "47", the location is district 16.
Based on this information in order to create an offline map, the components/data structures used are as follows:
An image of a Map that lies on a grid (JavaFx GridPane)
This is the component that displays on the dashboard. This component creates and
updates the placeholders on the map based on the information that it is provided. The component
has no knowledge of changes to the list of orders. Instead, it exposes 2 methods, initialise
and clear that is used by the higher-order component to update the placeholders.
The code snippet for the initialisation of the placeholders is shown below. Further details on the data passed in is given below.
public void initialise(HashMap<String, Integer> orderMap) {
    // for each postal code
    for (String postalCodeKey : orderMap.keySet()) {

        if (POSTAL_CODE_CACHE.containsKey(postalCodeKey)) {

            int regionCode = POSTAL_CODE_CACHE.get(postalCodeKey);
            Integer[] coordinates = DISTRICT_CACHE.get(regionCode);

            placeholderContainer = new ImageView(placeholder);

            int count = orderMap.get(postalCodeKey);
            int increment = 16 + count * 2;

            placeholderContainer.setPreserveRatio(true);
            placeholderContainer.setFitHeight(increment);
            placeholderContainer.setFitWidth(increment);

            mapPane.add(placeholderContainer, coordinates[1], coordinates[0]);
        }
    }
}
A Hashtable (Java HashMap) that maps the first two digits of the postal
code to a specific coordinate on the grid
As mentioned above, the map is an image that lies on a grid. The placeholders are put onto a specific coordinate specified on the grid. The Map component is thus given a Hash Table of how many orders fall under a specific postal code region. An example data that it could be given is shown below:
| Postal Code Region | Count |
|---|---|
61 |
5 |
16 |
1 |
32 |
2 |
Using this information, the MapPanel uses another lookup table to find out
which coordinate the placeholder should be put inside. For example, postal code 61, is
to be put inside grid {row: 6, column: 2}. The size of the placeholder is determined
by the count of orders that fall within a specific region.
The job of the Display component is to process the list of Orders into the format shown
in the table above. It then calls specific method on the MapPanel component to allow
for placeholders to be shown on the map. This is how the map is able to show locations
of orders without relying on any internet connection.
3.2.3. Statistics Panel
Another aspect for the dashboard is the statistics panel.
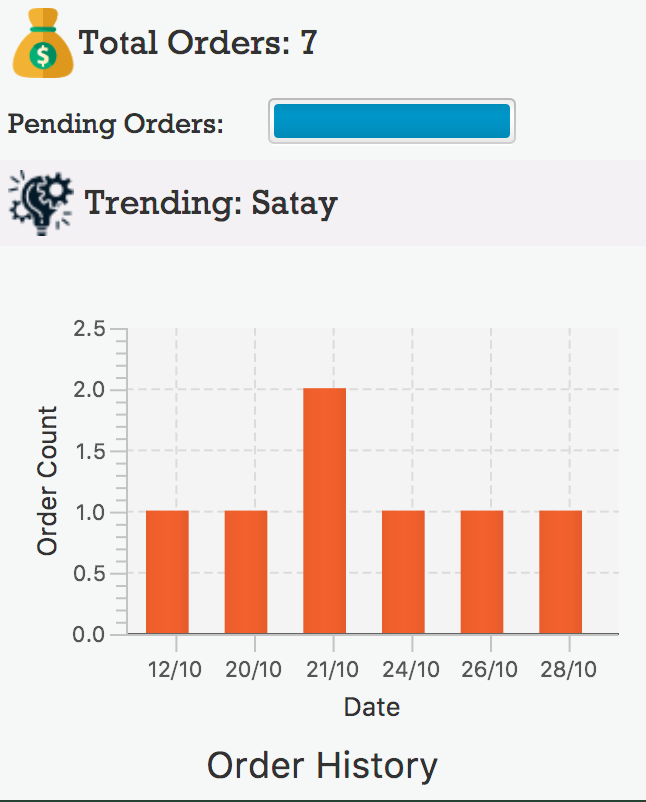
Figure 3.2.3.1 A closer look at the statistics panel in the dashboard
The statistics panel has four key indicators:
-
The total number of orders displayed
-
The percentage of orders that are still pending
-
The most common food item bought
-
The Order History for the last 7 days in which there was at least one order
Similar to the MapPanel, there is a StatisticsPanel which updates these statistics based
on the information that it is provided from a higher-level component. It has similar methods
to the MapPanel that allow data to be initialized and cleared.
The data that is passed in to the StatisticsPanel along with the techniques employed to
process the data is further elaborated on in the table below:
| Statistic | Data Structure | Technique |
|---|---|---|
Total Orders |
Variable |
Count the orders in the list |
Pending Order Percentage |
Variable |
Count orders with status "PENDING" and divide with total orders |
Trending Food Item |
HashTable |
Use a lookup table to track the count of each food item in menu. Each time there is an update ot the orders, run through the table and see which food item has the largest count value. |
Order Histogram |
Balanced Binary Search Tree (Java |
The dates from the Orders are put into a binary search tree along with their count. The tree uses a custom comparator that allows for dates to be compared with each other. This allows the 7 most recent dates with at least one order to be retrieved quickly. The tree is updated accordingly when orders are added or removed. |
3.2.4. Design Considerations (for both Map/Statistics)
Aspect: Processing of data
-
Alternative 1 (Current Approach): Let the UI component handle the processing of data once the listener detects a change
-
Pros:
-
Separation of Concerns: the UI need not rely on other components to update the statistics once a change has been detected.
-
-
Cons:
-
There is a lot of code within the UI component itself and this solution is not very scalable. If more statistics are needed in the future, it will be difficult to configure.
-
-
-
Alternative 2 : Create a Statistics Manager under Model
Instead of doing all the processing of data in the UI component itself, one consideration was to use a statistics manager. This manager will take in the list of orders and return the required statistics needed.
-
Pros:
-
This solution is more scalable. By having a separate class dedicated to managing the statistics of orders, it is easier to add in much more complex statistics for the application in future.
-
-
Cons:
-
There is more coupling. The UI has to constantly check with the statistics manager once a change to the observable list is detected.
-
The code becomes much more complex. There also may be a need to re-look at how the entire listener pattern is established.
-
Aspect: Gathering Location Data
-
Alternative 1 (Current Approach): Use a cache to map points based on the first 2 digits of postal code
-
Pros:
-
The application would work offline.
-
There is no reliance on an external API service for the application to function. If the API service fails to function at any point of time, the map may not work anymore.
-
-
Cons:
-
There are inaccuracies in the data that is displayed on the map. It is also not very precise. e.g. You cannot zoom into the map and locate where exactly the orders are.
-
-
-
Alternative 2 : Make use of an external API service like Google Maps to render the location placeholders on the map
-
Pros:
-
The location data would be much more accurate and precise. Locations can be mapped exactly as they are. Relying on a powerful service could mean that this map feature can even be extended to work globally (not just Singapore).
-
-
Cons:
-
As mentioned above, there will now be a reliance on this service for this application to work. This would also introduce more overhead to the code e.g there is now a need to check for internet connection and render loaders so that the user experience is not affected.
-
-
3.3. Add Order Feature
3.3.1. Current Implementation
The add order command allows the Manager to create a new order and add it to the list of orders.
Adding a new order requires the customer’s name, customer’s phone number, customer’s address, food and the datetime.
The format of the add command is /order add n/NAME p/PHONE a/ADDRESS f/FOOD dt/DATETIME.
The following sequence shows the sequence when the add command is execute by the Manager:
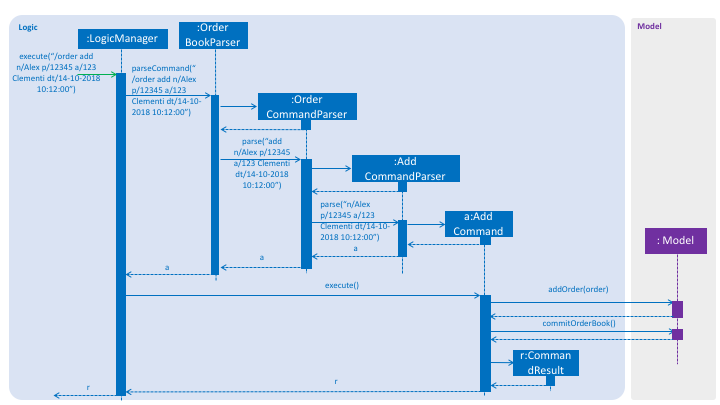
Figure 3.3.1.1 Sequence Diagram for order find command
From the diagram above:
-
LogicManager’s execute is called when the `Managerkeys in/order addand it calls uponparseCommandofOrderBookParserto parse the command -
OrderBookParserwill initializeOrderCommandParserand invoke the methodparseto further parseordercommand -
AddCommandParserwill be invoked and passed the parameters of the add command. -
If all the arguments of the
addcommands are valid,AddCommandwill be returned to theLogicManager -
LogicMangerwill then calls the methodexecutemethod ofAddCommand -
AddCommandwill calladdOrderpassingOrderas an argument toModeland after callscommitOrderBookmethod fromModel -
A
CommandResultwill be returned at the end,
3.3.2. Design Consideration
Aspect: Data Structure for the list of Orders
-
Alternative 1 (Current Approach): Using a
UniqueOrderList-
Pros: The comparison is not as rigid. You can create orders with similar names/address as long as it passes a less stringent criteria.
-
Cons: You need additional overhead. You need to create an extra class and function to check.
-
-
Alternative 2: Using a
Set-
Pros: Do not need an extra function. You can use use
equalsfor comparison -
Cons: It is a strict check and as a result you will not be allowed to create orders with same address/same name etc.
-
Aspect: Data Structure of Order
-
Alternative 1 (Current Approach): All parameters in
Orderare abstracted out to have a class of its own.-
Pros: It adheres to the Single Responsibility Principles (SRP) and the Separation of Concerns (SoC) as each parameter checks whether it is valid
-
Cons: Many different classes are created which increases the complexity of the code
-
-
Alternative 2: Store all parameters of
OrderasString-
Pros: Easy to implement.
-
Cons: Violates SRP as one single class will need to check if the arguments are valid.
-
3.4. Find Order Feature
3.4.1. Current Implementation
The order find command allows searching of orders in FoodZoom. It allows searching for orders with any order fields.
The following sequence diagram shows the sequence flow from the LogicManager to the ModelManager when a user enter a find command:
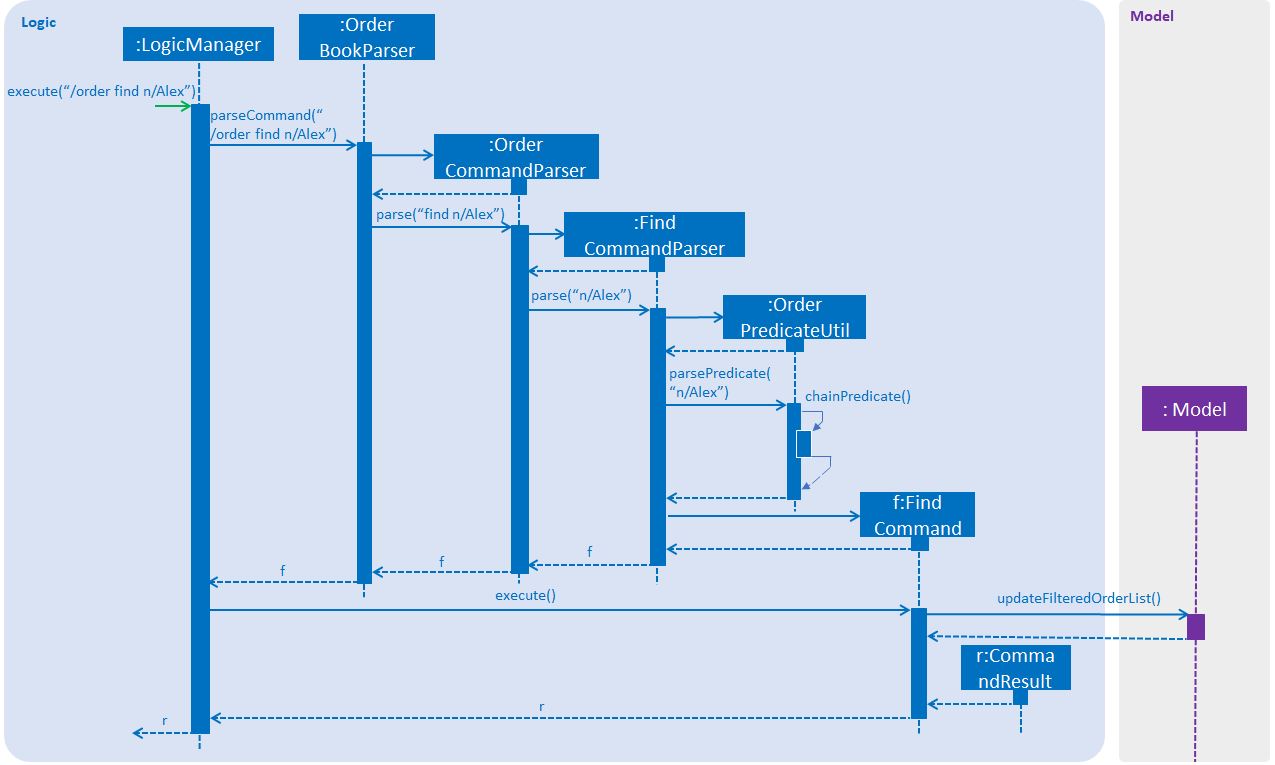
Figure 3.4.1.1 Sequence Diagram for order find command
From the sequence diagram:
-
When
LogicManagerreceive theexecutecommand, it calls theparseCommandmethod inOrderBookParser. -
OrderBookParserwill receive/orderas the command and instantiateOrderCommandParserto further parse the command. -
OrderCommandParserreceivefindas the command and callsFindCommandParserto handle the fields for the find command. -
If at least one field is provided,
FindCommandParserwill callparsePredicateofOrderPredicateUtilto handle the given fields. -
OrderPredicateUtilwill call its ownchainPredicateto create the predicate for the relevant fields. -
If all fields give are valid,
FindCommandwill be created and return back toLogicManager. -
LogicManagerwill proceed to call execute ofFindCommand. -
FindCommandwill update the list in theModeland create a newCommandResultto be returned.
The differentiation is handled by OrderPredicateUtil which checks for the fields provided. It throws ParseException if a invalid order field is specified or when any field is given without any value.
OrderPredicateUtil will chain up the different fields and return a Predicate<Order> to narrow the scope
of the search.
Datetime search can be performed in two ways. Below is a sequence diagram to show flow of how datetime search:

Figure 3.4.1.2 Sequence Diagram for datetime search
-
If one
datetimefield is given,OrderDatePredicatecreates aOrderDateSinglePredicateobject and run its'testmethod. -
If more than one
datetimefield is given,OrderDatePredicatecreates aOrderDateRangePredicateobject and run its'testmethod.
3.4.2. Design Consideration
Aspect: Implementation of FindCommand
-
Alternative 1 (current choice): All different order field having its own test method.
-
Pros: It adheres to the Single Responsibility Principle (SRP) and the Separation of Concern (SoC). Each predicate handles its own search values.
-
Cons: More classes will be needed, which results in higher complexity of the code base.
-
-
Alternative 2: One predicate class to handle all the predicates.
-
Pros: Reduces the number of classes, which makes it for new developers to understand.
-
Cons: It decreases the cohesion as one class will need to handle different predicates.
-
Aspect: Implementation of FindCommandParser
-
Alternative 1 (current choice): Further parsing of the predicates are passed to
OrderPredicateUtilto handle-
Pros: It adheres to SRP as the handling of the predicates are passed on to
OrderPredicateUtilclass. -
Cons: Increase in the complexity of the code as more classes are needed, with more lines of code being written
-
-
Alternative 2:
FindCommandParserto handles the predicates.-
Pros: It makes it easy for new developers to understand the code as
FindCommandParserhandles all the parsing of the predicates -
Cons: It violates SRP.
FindCommandParserhas to break down the fields as well as check which fields are present.
-
3.5. Add deliveryman feature
3.5.1. Current Implementation
The add deliveryman command allows the Manager to add deliveryman into FoodZoom. It ensures that the newly-added deliveryman
is not a duplicate of an existing deliveryman.
The following diagram shows the sequence flow from the LogicManager to the ModelManager when a user enters a /deliveryman add
command:
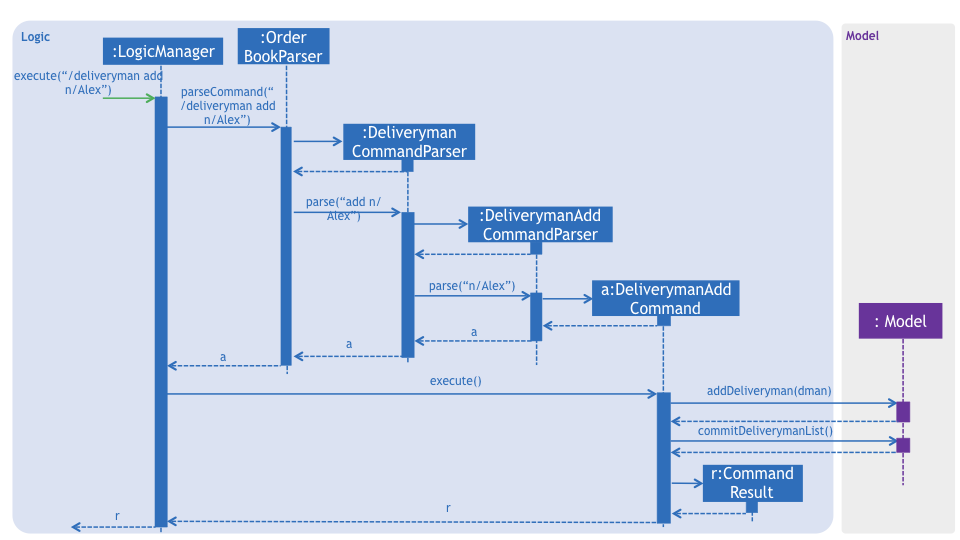
Figure 3.5.1.1 Sequence Diagram for deliveryman add command
From Figure 3.5.1.1:
-
When
LogicManagerreceives theexecutecommand from the App, it calls theparseCommandmethod inOrderBookParser. -
OrderBookParserwill receive/deliverymanas the command and instantiateDeliverymanCommandParserto parse the rest of the command. -
If the arguments specified in the
addcommand are valid, aDeliverymanAddCommandwould be created and returned back to theLogicManager. -
LogicManagerwould proceed to callexecuteof theDeliverymanAddCommand. -
A new deliveryman would be added and a successful
CommandResultwould be returned and displayed.
FoodZoom’s deliveryman is only stored with names currently, and can be search and listed only with names.
These names are checked against validations with the Name model, and this is a compulsory
field for a deliveryman to be added. If the provided command either does not have a name, or is an invalid Name,
a ParseException would be thrown.
3.5.2. Design Considerations
Implementation of DeliverymanAddCommandParser
This concerns the implementation and organization of a DeliverymanAddCommand
-
Alternative 1 (current choice):
DeliverymanCommandis parsed first, then as aDeliverymanAddCommand.-
Pros: Better modularization for all commands relating to
Deliveryman -
Cons: More complicated file & package organization
-
-
Alternative 2:
DeliverymanAddCommandis parsed straight fromOrderBookParser-
Pros: Easier to manage file structure
-
Cons: Poor modularization of related
Commandclasses.
-
Implementation of DeliverymanAddCommand
This concerns how deliverymen data is stored with relation to orders.
-
Alternative 1 (current choice): Deliverymen are stored in separate file
-
Pros: Allows for greater flexibility in how deliverymen interact with other resources like order/routes - better separation of concerns.
-
Cons: Harder to implement & maintain
-
-
Alternative 2: Deliverymen are stored in the same file as
Order-
Pros: Easier to implement & maintain
-
Cons: Deliveryman can only be accessed & treated as parts of an
Order
-
3.6. Create Route Feature [deprecated since v1.2.1]
This feature is deprecated as there was a design change regarding the relationship between delivery man and order. Previously, route was the middleman between delivery men and orders. Now, delivery men and orders are directly related. Route is removed as its existence will complicate implementations of other features without adding much benefit.
3.6.1. Current Implementation
The create route command allows creation of routes in FoodZoom.
It allows creating routes based on the order ids.
The following sequence diagram shows the sequence flow from the LogicManager to the ModelManager when a user enter a /route create command:
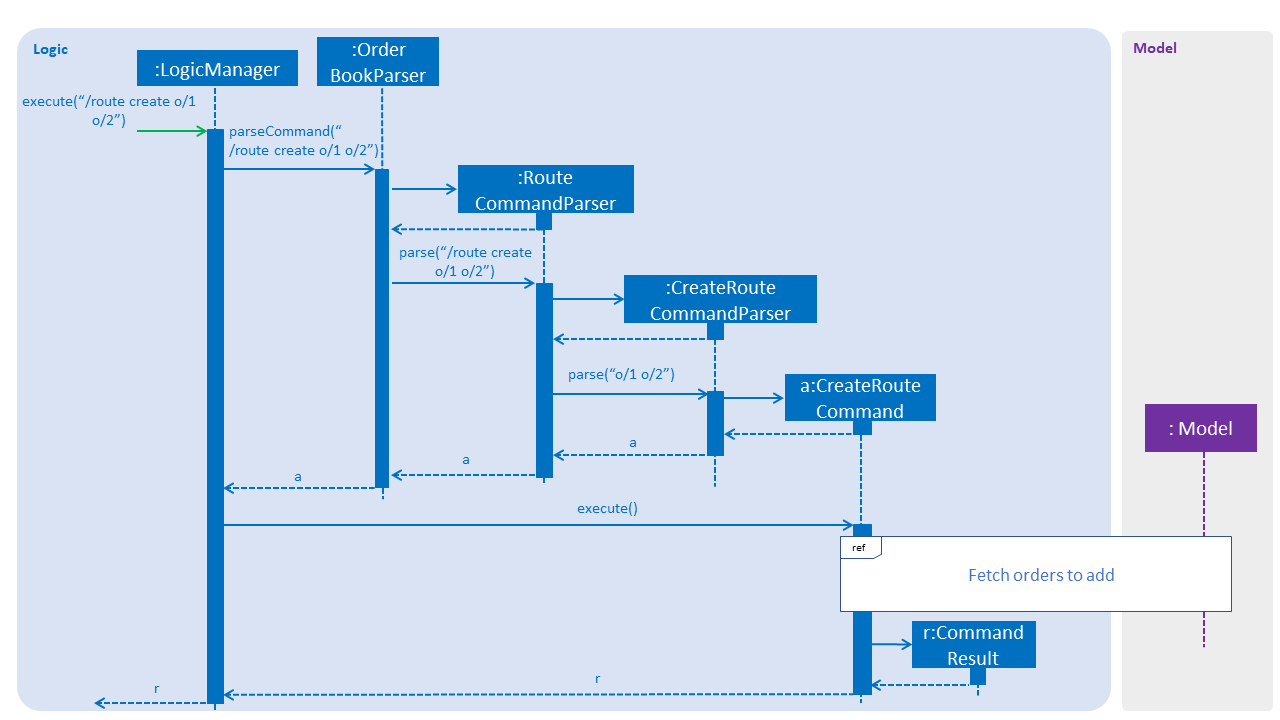
Figure 3.6.1.1 Sequence diagram to illustrate Logic component interactions for route create command.
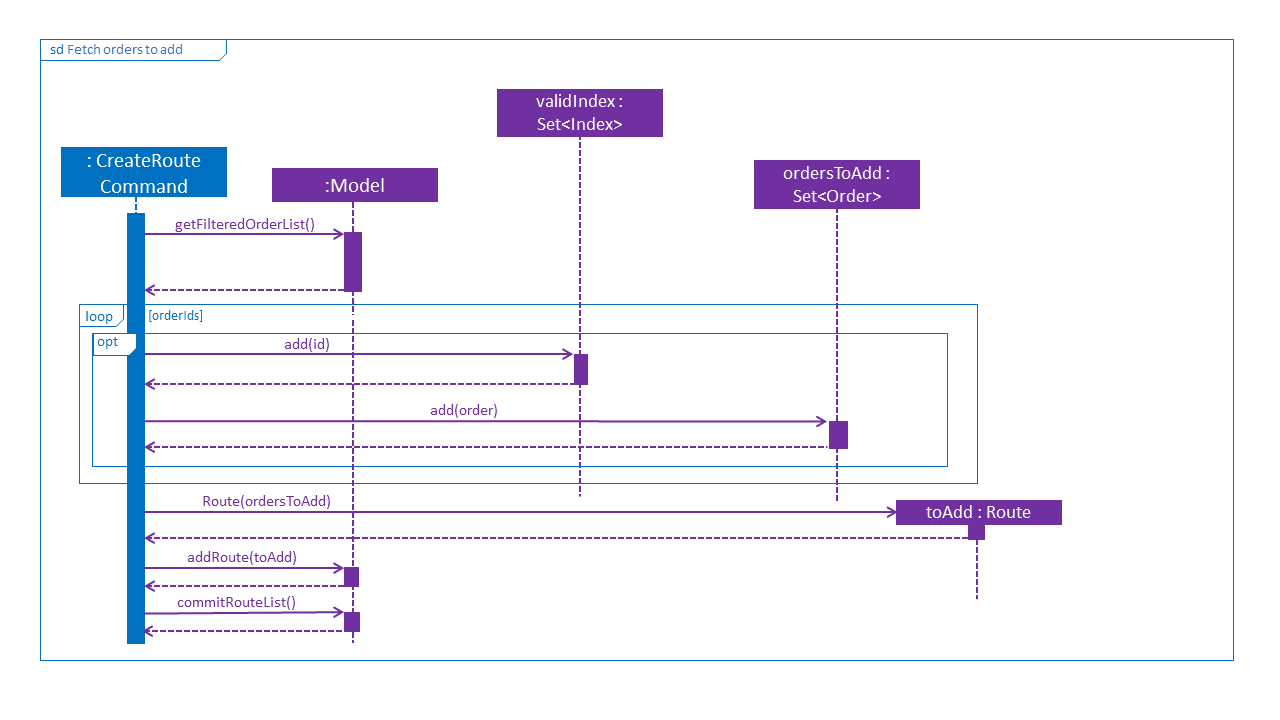
Figure 3.6.1.2 Sequence diagram to illustrate Logic and Model component interactions for route create command.
From the sequence diagram:
-
When
LogicManagerreceive theexecutecommand, it calls theparseCommandmethod inOrderBookParser. -
OrderBookParserwill receive/routeas the command and instantiateRouteCommandParserto further parse the command. -
If the arguments specified in the
createcommand are valid, aCreateRouteCommandwill be created and return back to theLogicManger -
LogicManagerwill proceed to call theexecutecommand ofCreateRouteCommand -
CreateRouteCommandwill proceed to call thegetFilteredOrderListmethod ofModel -
Iterate through the
orderIds, if valid, add theIndexand the correspondingOrderto the set ofIndexandOrderrespectively. -
Create a
Routefrom the set ofOrder -
A new route would be added and create a new
CommandResultto be returned.
3.6.2. Design Consideration
Aspect: Implementation of CreateRouteCommandParser
-
Alternative 1 (current choice):
RouteCommandParseris parsed first, then pass toCreateRouteCommandParser-
Pros: Better modularization for
Routecommands, better cohesion, adheres to the Single Responsibility Principle. -
Cons: More complicated file & package structure.
-
-
Alternative 2:
CreateRouteCommandis parsed straight fromOrderBookParser.-
Pros: Easier to manage the file structure.
-
Cons: Poor modularization of the
Commandclasses.
-
3.7. Assign feature
3.7.1. Current Implementation
The /assign command allows assigning of multiple orders to a delivery man in FoodZoom.
The following sequence diagram shows the sequence flow from the LogicManager to the ModelManager when a user enter a /assign command:
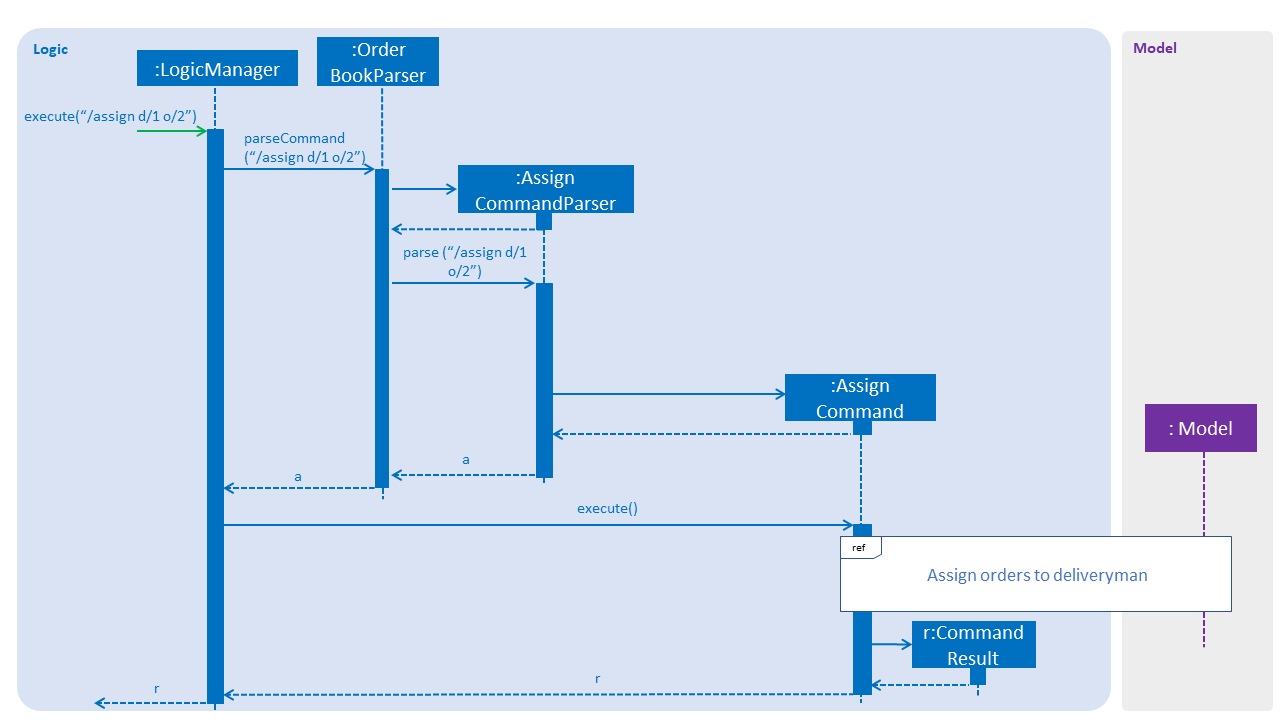
Figure 3.7.1.1 Sequence diagram to illustrate Logic component interactions for /assign command.
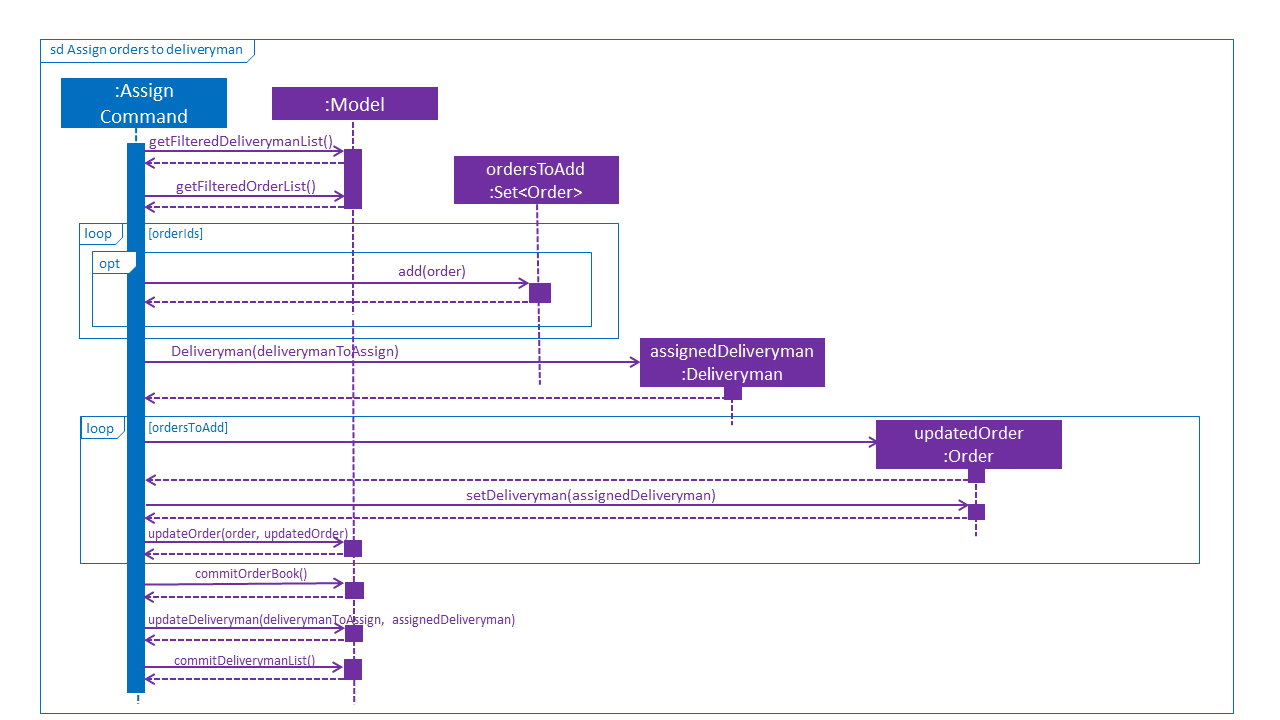
Figure 3.7.1.2 Sequence diagram to illustrate Logic and Model component interactions for route create command.
From the sequence diagram:
-
When
LogicManagerreceive theexecutecommand, it calls theparseCommandmethod inOrderBookParser. -
OrderBookParserwill receive/assignas the command and instantiateAssignCommandParserto further parse the command. -
If the arguments specified in the
/assigncommand are valid, aAssignCommandwill be created and return back to theLogicManger -
LogicManagerwill proceed to call theexecutecommand ofAssignCommand -
AssignCommandwill proceed to call thegetFilteredOrderListandgetFilteredDeliverymanListmethod ofModel -
Iterate through the
orderIds, if valid, add theordercorresponding to thatindexto the set ofOrder. -
Create a new
Deliverymanto be assigned from thedeliverymancorresponding to the deliveryman index. -
Iterate through the orders, call
setDeliveryman. -
A new route would be added and create a new
CommandResultto be returned.
3.7.2. Design Consideration
Aspect: Relationship between Order and Deliveryman
-
Alternative 1 (current choice): Two way associations between the
OrderandDeliveryman-
Pros: Performing update operations such as assigning orders or marking orders as completed and displaying information on each order and delivery man are more effective as they are aware of one another.
-
Cons: More complicated to implement the assigning of order, and subsequently other features regarding this relationship such as removing of order.
-
-
Alternative 2: Only the
Deliverymanis aware of theOrder-
Pros: Easier to implement the feature and manage the order and deliveryman states.
-
Cons: Performing the update operations mentioned above will be ineffective, and it will be more difficult to display information on which delivery man an order is assigned to.
-
3.8. Logging
We are using java.util.logging package for logging. The LogsCenter class is used to manage the logging levels and logging destinations.
-
The logging level can be controlled using the
logLevelsetting in the configuration file (See Section 3.9, “Configuration”) -
The
Loggerfor a class can be obtained usingLogsCenter.getLogger(Class)which will log messages according to the specified logging level -
Currently log messages are output through:
Consoleand to a.logfile.
Logging Levels
-
SEVERE: Critical problem detected which may possibly cause the termination of the application -
WARNING: Can continue, but with caution -
INFO: Information showing the noteworthy actions by the App -
FINE: Details that is not usually noteworthy but may be useful in debugging e.g. print the actual list instead of just its size
3.9. Configuration
Certain properties of the application can be controlled (e.g App name, logging level) through the configuration file (default: config.json).
4. Documentation
We use asciidoc for writing documentation.
| We chose asciidoc over Markdown because asciidoc, although a bit more complex than Markdown, provides more flexibility in formatting. |
4.1. Editing Documentation
See UsingGradle.adoc to learn how to render .adoc files locally to preview the end result of your edits.
Alternatively, you can download the AsciiDoc plugin for IntelliJ, which allows you to preview the changes you have made to your .adoc files in real-time.
4.2. Publishing Documentation
See UsingTravis.adoc to learn how to deploy GitHub Pages using Travis.
4.3. Converting Documentation to PDF format
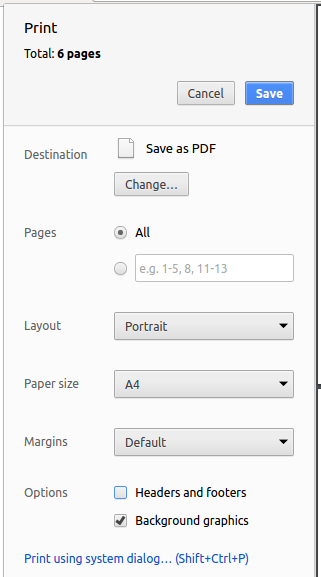
We use Google Chrome for converting documentation to PDF format, as Chrome’s PDF engine preserves hyperlinks used in webpages.
Here are the steps to convert the project documentation files to PDF format.
-
Follow the instructions in UsingGradle.adoc to convert the AsciiDoc files in the
docs/directory to HTML format. -
Go to your generated HTML files in the
build/docsfolder, right click on them and selectOpen with→Google Chrome. -
Within Chrome, click on the
Printoption in Chrome’s menu. -
Set the destination to
Save as PDF, then clickSaveto save a copy of the file in PDF format. For best results, use the settings indicated in the screenshot below.
4.4. Site-wide Documentation Settings
The build.gradle file specifies some project-specific asciidoc attributes which affects how all documentation files within this project are rendered.
Attributes left unset in the build.gradle file will use their default value, if any.
|
| Attribute name | Description | Default value |
|---|---|---|
|
The name of the website. If set, the name will be displayed near the top of the page. |
not set |
|
URL to the site’s repository on GitHub. Setting this will add a "View on GitHub" link in the navigation bar. |
not set |
|
Define this attribute if the project is an official SE-EDU project. This will render the SE-EDU navigation bar at the top of the page, and add some SE-EDU-specific navigation items. |
not set |
4.5. Per-file Documentation Settings
Each .adoc file may also specify some file-specific asciidoc attributes which affects how the file is rendered.
Asciidoctor’s built-in attributes may be specified and used as well.
Attributes left unset in .adoc files will use their default value, if any.
|
| Attribute name | Description | Default value |
|---|---|---|
|
Site section that the document belongs to.
This will cause the associated item in the navigation bar to be highlighted.
One of: * Official SE-EDU projects only |
not set |
|
Set this attribute to remove the site navigation bar. |
not set |
4.6. Site Template
The files in docs/stylesheets are the CSS stylesheets of the site.
You can modify them to change some properties of the site’s design.
The files in docs/templates controls the rendering of .adoc files into HTML5.
These template files are written in a mixture of Ruby and Slim.
|
Modifying the template files in |
5. Testing
5.1. Running Tests
There are three ways to run tests.
| The most reliable way to run tests is the 3rd one. The first two methods might fail some GUI tests due to platform/resolution-specific idiosyncrasies. |
Method 1: Using IntelliJ JUnit test runner
-
To run all tests, right-click on the
src/test/javafolder and chooseRun 'All Tests' -
To run a subset of tests, you can right-click on a test package, test class, or a test and choose
Run 'ABC'
Method 2: Using Gradle
-
Open a console and run the command
gradlew clean allTests(Mac/Linux:./gradlew clean allTests)
| See UsingGradle.adoc for more info on how to run tests using Gradle. |
Method 3: Using Gradle (headless)
Thanks to the TestFX library we use, our GUI tests can be run in the headless mode. In the headless mode, GUI tests do not show up on the screen. That means the developer can do other things on the Computer while the tests are running.
To run tests in headless mode, open a console and run the command gradlew clean headless allTests (Mac/Linux: ./gradlew clean headless allTests)
5.2. Types of tests
We have two types of tests:
-
GUI Tests - These are tests involving the GUI. They include,
-
System Tests that test the entire App by simulating user actions on the GUI. These are in the
systemtestspackage. -
Unit tests that test the individual components. These are in
seedu.address.uipackage.
-
-
Non-GUI Tests - These are tests not involving the GUI. They include,
-
Unit tests targeting the lowest level methods/classes.
e.g.seedu.address.commons.StringUtilTest -
Integration tests that are checking the integration of multiple code units (those code units are assumed to be working).
e.g.seedu.address.storage.StorageManagerTest -
Hybrids of unit and integration tests. These test are checking multiple code units as well as how the are connected together.
e.g.seedu.address.logic.LogicManagerTest
-
5.3. Troubleshooting Testing
Problem: HelpWindowTest fails with a NullPointerException.
-
Reason: One of its dependencies,
HelpWindow.htmlinsrc/main/resources/docsis missing. -
Solution: Execute Gradle task
processResources.
6. Dev Ops
6.1. Build Automation
See UsingGradle.adoc to learn how to use Gradle for build automation.
6.2. Continuous Integration
We use Travis CI and AppVeyor to perform Continuous Integration on our projects. See UsingTravis.adoc and UsingAppVeyor.adoc for more details.
6.3. Coverage Reporting
We use Coveralls to track the code coverage of our projects. See UsingCoveralls.adoc for more details.
6.4. Documentation Previews
When a pull request has changes to asciidoc files, you can use Netlify to see a preview of how the HTML version of those asciidoc files will look like when the pull request is merged. See UsingNetlify.adoc for more details.
6.5. Making a Release
Here are the steps to create a new release.
-
Update the version number in
MainApp.java. -
Generate a JAR file using Gradle.
-
Tag the repo with the version number. e.g.
v0.1 -
Create a new release using GitHub and upload the JAR file you created.
6.6. Managing Dependencies
A project often depends on third-party libraries. For example, Address Book depends on the Jackson library for XML parsing. Managing these dependencies can be automated using Gradle. For example, Gradle can download the dependencies automatically, which is better than these alternatives.
a. Include those libraries in the repo (this bloats the repo size)
b. Require developers to download those libraries manually (this creates extra work for developers)
Appendix A: Suggested Programming Tasks to Get Started
Suggested path for new programmers:
-
First, add small local-impact (i.e. the impact of the change does not go beyond the component) enhancements to one component at a time. Some suggestions are given in Section A.1, “Improving each component”.
-
Next, add a feature that touches multiple components to learn how to implement an end-to-end feature across all components. Section A.2, “Creating a new command:
remark” explains how to go about adding such a feature.
A.1. Improving each component
Each individual exercise in this section is component-based (i.e. you would not need to modify the other components to get it to work).
Logic component
Scenario: You are in charge of logic. During dog-fooding, your team realize that it is troublesome for the user to type the whole command in order to execute a command. Your team devise some strategies to help cut down the amount of typing necessary, and one of the suggestions was to implement aliases for the command words. Your job is to implement such aliases.
Do take a look at [Design-Logic] before attempting to modify the Logic component.
|
-
Add a shorthand equivalent alias for each of the individual commands. For example, besides typing
clear, the user can also typecto remove all persons in the list.
Model
Scenario: You are in charge of model. One day, the logic-in-charge approaches you for help. He wants to implement a command such that the user is able to remove a particular tag from everyone in the address book, but the model API does not support such a functionality at the moment. Your job is to implement an API method, so that your teammate can use your API to implement his command.
Do take a look at [Design-Model] before attempting to modify the Model component.
|
-
Add a
removeTag(Tag)method. The specified tag will be removed from everyone in the address book.
Ui component
Scenario: You are in charge of ui. During a beta testing session, your team is observing how the users use your address book application. You realize that one of the users occasionally tries to delete non-existent tags from a contact, because the tags all look the same visually, and the user got confused. Another user made a typing mistake in his command, but did not realize he had done so because the error message wasn’t prominent enough. A third user keeps scrolling down the list, because he keeps forgetting the index of the last person in the list. Your job is to implement improvements to the UI to solve all these problems.
Do take a look at [Design-Ui] before attempting to modify the UI component.
|
-
Use different colors for different tags inside person cards. For example,
friendstags can be all in brown, andcolleaguestags can be all in yellow.Before
After

-
Modify
NewResultAvailableEventsuch thatResultDisplaycan show a different style on error (currently it shows the same regardless of errors).Before
After
-
Modify the
StatusBarFooterto show the total number of people in the address book.Before

After

Storage component
Scenario: You are in charge of storage. For your next project milestone, your team plans to implement a new feature of saving the address book to the cloud. However, the current implementation of the application constantly saves the address book after the execution of each command, which is not ideal if the user is working on limited internet connection. Your team decided that the application should instead save the changes to a temporary local backup file first, and only upload to the cloud after the user closes the application. Your job is to implement a backup API for the address book storage.
Do take a look at [Design-Storage] before attempting to modify the Storage component.
|
-
Add a new method
backupOrderBook(ReadOnlyOrderBook), so that the address book can be saved in a fixed temporary location.
A.2. Creating a new command: remark
By creating this command, you will get a chance to learn how to implement a feature end-to-end, touching all major components of the app.
Scenario: You are a software maintainer for orderbook, as the former developer team has moved on to new projects.
The current users of your application have a list of new feature requests that they hope the software will eventually have. The most popular request is to allow adding additional comments/notes about a particular contact, by providing a flexible remark field for each contact, rather than relying on tags alone. After designing the specification for the remark command, you are convinced that this feature is worth implementing. Your job is to implement the remark command.
A.2.1. Description
Edits the remark for a person specified in the INDEX.
Format: remark INDEX r/[REMARK]
Examples:
-
remark 1 r/Likes to drink coffee.
Edits the remark for the first person toLikes to drink coffee. -
remark 1 r/
Removes the remark for the first person.
A.2.2. Step-by-step Instructions
[Step 1] Logic: Teach the app to accept 'remark' which does nothing
Let’s start by teaching the application how to parse a remark command. We will add the logic of remark later.
Main:
-
Add a
RemarkCommandthat extendsCommand. Upon execution, it should just throw anException. -
Modify
OrderBookParserto accept aRemarkCommand.
Tests:
-
Add
RemarkCommandTestthat tests thatexecute()throws an Exception. -
Add new test method to
OrderBookParserTest, which tests that typing "remark" returns an instance ofRemarkCommand.
[Step 2] Logic: Teach the app to accept 'remark' arguments
Let’s teach the application to parse arguments that our remark command will accept. E.g. 1 r/Likes to drink coffee.
Main:
-
Modify
RemarkCommandto take in anIndexandStringand print those two parameters as the error message. -
Add
RemarkCommandParserthat knows how to parse two arguments, one index and one with prefix 'r/'. -
Modify
OrderBookParserto use the newly implementedRemarkCommandParser.
Tests:
-
Modify
RemarkCommandTestto test theRemarkCommand#equals()method. -
Add
RemarkCommandParserTestthat tests different boundary values forRemarkCommandParser. -
Modify
OrderBookParserTestto test that the correct command is generated according to the user input.
[Step 3] Ui: Add a placeholder for remark in PersonCard
Let’s add a placeholder on all our PersonCard s to display a remark for each person later.
Main:
-
Add a
Labelwith any random text insidePersonListCard.fxml. -
Add FXML annotation in
PersonCardto tie the variable to the actual label.
Tests:
-
Modify
PersonCardHandleso that future tests can read the contents of the remark label.
[Step 4] Model: Add Remark class
We have to properly encapsulate the remark in our Person class. Instead of just using a String, let’s follow the conventional class structure that the codebase already uses by adding a Remark class.
Main:
-
Add
Remarkto model component (you can copy fromAddress, remove the regex and change the names accordingly). -
Modify
RemarkCommandto now take in aRemarkinstead of aString.
Tests:
-
Add test for
Remark, to test theRemark#equals()method.
[Step 5] Model: Modify Person to support a Remark field
Now we have the Remark class, we need to actually use it inside Person.
Main:
-
Add
getRemark()inPerson. -
You may assume that the user will not be able to use the
addandeditcommands to modify the remarks field (i.e. the person will be created without a remark). -
Modify
SampleDataUtilto add remarks for the sample data (delete yourorderBook.xmlso that the application will load the sample data when you launch it.)
[Step 6] Storage: Add Remark field to XmlAdaptedPerson class
We now have Remark s for Person s, but they will be gone when we exit the application. Let’s modify XmlAdaptedPerson to include a Remark field so that it will be saved.
Main:
-
Add a new Xml field for
Remark.
Tests:
-
Fix
invalidAndValidPersonOrderBook.xml,typicalPersonsOrderBook.xml,validOrderBook.xmletc., such that the XML tests will not fail due to a missing<remark>element.
[Step 6b] Test: Add withRemark() for PersonBuilder
Since Person can now have a Remark, we should add a helper method to PersonBuilder, so that users are able to create remarks when building a Person.
Tests:
-
Add a new method
withRemark()forPersonBuilder. This method will create a newRemarkfor the person that it is currently building. -
Try and use the method on any sample
PersoninTypicalPersons.
[Step 7] Ui: Connect Remark field to PersonCard
Our remark label in PersonCard is still a placeholder. Let’s bring it to life by binding it with the actual remark field.
Main:
-
Modify
PersonCard's constructor to bind theRemarkfield to thePerson's remark.
Tests:
-
Modify
GuiTestAssert#assertCardDisplaysPerson(…)so that it will compare the now-functioning remark label.
[Step 8] Logic: Implement RemarkCommand#execute() logic
We now have everything set up… but we still can’t modify the remarks. Let’s finish it up by adding in actual logic for our remark command.
Main:
-
Replace the logic in
RemarkCommand#execute()(that currently just throws anException), with the actual logic to modify the remarks of a person.
Tests:
-
Update
RemarkCommandTestto test that theexecute()logic works.
A.2.3. Full Solution
See this PR for the step-by-step solution.
Appendix B: Product Scope
Target user profile:
-
Business Owners and Delivery Man
-
Needs to manage a large collection of orders
-
Needs to dispatch orders to relevant delivery man
-
Wants to view route information and calculate timings
-
Wants insights on purchases and order history
-
is reasonably comfortable using CLI apps
Value proposition: Integrate end-to-end systems and streamline food delivery management
Appendix C: User Stories
Priorities: High (must have) - * * *, Medium (nice to have) - * *, Low (unlikely to have) - *
| Priority | As a … | I want to … | So that I can… |
|---|---|---|---|
|
new manager |
see usage instructions |
refer to instructions when I forget how to use the App |
|
manager |
login/logout/signup of application |
able to protect my data and access it when I need do |
|
manager |
add a new customer order |
can track the current orders I have |
|
manager |
add or remove a deliveryman |
can manage the deliverymen available to dispatch orders |
|
manager |
assign orders to available deliverymen |
can send out orders and fulfil customer requests |
|
manager |
delete an order |
can cancel orders that should not be in the queue |
|
manager |
find an order using phone number |
can find specific orders quickly |
|
manager |
update my menu (add/remove food items) |
can manage the food items I have and expand by business |
|
manager |
view a basic route for order |
have a clearer idea on how to dispatch my deliverymen |
|
manager |
find orders by more files (name, food item etc.) |
have more options to locate specific orders |
|
manager |
trace status of orders (estimated timeline) |
can have visibility on when orders will be delivered |
|
manager |
have a dashboard to view succesful and failed orders |
can have insights on how my outlet is doing |
|
manager |
have a dynamic indication of which deliveryman is available |
can send out multiple orders to many deliverymen and have improved service |
|
manager |
view individual customer order history |
gain insights on what specific customers are ordering |
|
manager |
find my deliverman by name |
find details about the deliveryman, |
|
manager |
see a thumbnail of deliveryman |
can easily tell who is who in one glance |
|
manager |
edit my order |
make changes to the order |
|
manager |
sms confirmation on succesful order |
have visibility on how my order delivery service is doing |
|
manager |
view a map with placeholders showing orders/deliverymen routes |
have immediate view on delivery status and gain insights on my service |
|
new deliveryman |
see usage instructions |
refer to instructions when I forget how to use the App |
|
deliveryman |
login/logout of application |
able to protect my data and access it when I need do |
|
deliveryman |
list assigned orders |
can tell what are the jobs I need to complete |
|
deliveryman |
get customer contact for orders |
can contact customer if there is a need (delivery delay/incorrect address/queries etc.) |
|
deliveryman |
view delivery route for orders |
dont have to consult external service to know how to reach the destination |
|
deliveryman |
confirm succesful order in system |
the manager can track the completion of orders |
|
deliveryman |
send feedback on delivery process |
the manager can relate and improve the dispatch service |
Appendix D: Use Cases
(For the use cases below, the System is FoodZoom and the Actor is the Managers)
Use Case: Add Order
MSS
-
Manager requests to add order to the FoodZoom
-
FoodZoom checks the format of the add command
-
FoodZoom adds the order to the database
-
FoodZoom shows success message to the manager
Use case ends.
Extensions
-
2a. Add command is invalid
-
2b. FoodZoom shows an error message to the manager
Use case ends.
Use Case: Find orders by phone number
MSS
-
Manager request to list orders by phone number
-
FoodZoom shows a list of orders and their status
-
Use case ends.
Extensions
-
1a. The phone number not found in the list of orders.
Use case ends.
Use Case: Assign Order to Delivery man
MSS
-
Manager requests to view pending orders
-
FoodZoom lists all orders
-
Manager adds pending orders to planner
-
FoodZoom shows travel route and timing details to Manager for all orders added
-
Manager requests to add route to available deliverymen
-
FoodZoom adds route to delivery man and displays on same screen
-
Manager requests to show routing information
-
Manager shown a screen showing what each deliveryman is assigned
Use case ends.
Extension
-
2a. No available orders
Use case ends.
-
4a. Travel Details cannot be fetched
-
4b. FoodZoom shows relevant error message to user
Use case ends.
-
-
5a. No available delivery-men
-
5b. FoodZoom shows error message
Use case ends.
-
Use Case: Delete Order
MSS
-
Manager requests to find the order by phone number
-
FoodZoom shows the order
-
Manager requests to delete the order
-
FoodZoom deletes the order
-
FoodZoom shows message order successfully deleted
Use case ends.
Extension
-
The order does not exist.
-
1a. FoodZoom shows message that order does not exist
Use case ends
-
(For the use cases below, the System is FoodZoom and the Actor is the Delivery-men)
Use Case: View Assigned Route
MSS
-
Delivery man logs in to the app
-
FoodZoom shows if delivery man has routes available
-
Delivery man requests for assigned route
-
FoodZoom shows the assigned route
-
Delivery man looks through each destination and checks address info
-
Delivery man checks for status of food
-
Deliveryman logs out to collect food & leave for delivery
Use case ends.
Extensions
-
2a. Delivery man doesn’t have any routes
Use case ends
-
4a. Location info is unclear to deliveryman
-
4b. Delivery man searches for order to get customer’s contact
-
4c. Delivery man contacts customer to clarify location
Use case ends
-
Appendix E: Non Functional Requirements
-
Should work on any mainstream OS as long as it has Java
9or higher installed. -
Should be able to hold up to 1000 orders and should respond within 2 seconds
-
The system should work on both 32-bit and 64-bit environments.
-
The system should only show data to the people with the appropriate roles
-
The system should persist data about orders for the past year
Appendix G: Product Survey
Product Name
Author: …
Pros:
-
…
-
…
Cons:
-
…
-
…
Appendix H: Instructions for Manual Testing
Given below are instructions to test the app manually.
| These instructions only provide a starting point for testers to work on; testers are expected to do more exploratory testing. |
H.1. Launch and Shutdown
-
Initial launch
-
Download the jar file and copy into an empty folder
-
Double-click the jar file
Expected: Shows the GUI with a set of sample contacts. The window size may not be optimum.
-
-
Saving window preferences
-
Resize the window to an optimum size. Move the window to a different location. Close the window.
-
Re-launch the app by double-clicking the jar file.
Expected: The most recent window size and location is retained.
-
H.2. Login into account
-
Login into the application
-
Prerequisites: Needs to be logged out of the application.
-
Test case: Invalid username and valid password
Command:/login u/1 pw/password123
Expected: Cannot login because username is too short and it needs to be 3 - 64 characters. -
Test case: Username with 65 characters (invalid) and valid password
Command:/login u/012345678901234567890123456789012345678901234567890123456789012345 pw/password123
Expected: Cannot login because username is too long and it needs to be 3 - 64 characters. -
Test case: Valid username and invalid password
Command:/login u/lucaskoh pw/123
Expected: Cannot login because password is too short and it needs to be at least 6 characters. -
Test case: Valid username and 6 characters password (valid)
Command:/login u/lucaskoh pw/123456
Expected: Cannot login because account does not exist.
-
-
Prerequisites: Application comes with default valid user.
-
Test case: Valid username and valid password
Command:/login u/alicepauline pw/alicepauline01
Expected: Successfully login into the application because of valid username and password and user exist in application. The application will bring you to the home page.
-
-
H.3. Sign up for an account
-
Sign up for an account
-
Prerequisites: No exisiting account in application.
-
Test case: Invalid name, valid username, valid password
Command:/signup n/lu u/lucaskoh pw/123456
Expected: Fail to sign up. Name is too short and it needs to be 3 - 64 characters long. -
Test case: Invalid name(65 characters long), valid username, valid password
Command:/signup n/012345678901234567890123456789012345678901234567890123456789012345 u/lucaskoh pw/123456
Expected: Fail to sign up. Name is too long and it needs to be 3 - 64 characters long. -
Test case: Valid name, invalid username, valid password
Command:/signup n/LucasKoh u/@1234~2! pw/123456
Expected: Fail to sign up. Username should only contain alphanumeric characters. -
Test case: Valid name, valid username, invalid password
Command:/signup n/LucasKoh u/lucaskoh pw/!!@@15
Expected: Fail to sign up. Password should only contain alphanumeric characters. -
Test case: Valid name, valid username, valid password
Command:/signup n/Lucas Koh u/lucaskoh pw/lucaskoh54321
Expected: Successfully sign up for account. Application will automatically logged you into the home page.
-
-
Prerequisites: Already have
n/Alice Pauline u/alicepauline pw/alicepauline01account within the application.-
Test case: Different name, same username and same password
Command:/signup n/Alicepauline u/alicepauline pw/alicepauline01
Expected: Fail to sign up. User already exist within the application.
-
-
H.4. Adding an Order
-
Prerequisites: Logged into the application. An order with name "John Lee", phone "98765432" and date "20-10-2018 00:00:00" does not already exist. To check, type
/order listto see all existing order.-
Test case:
/order add n/John Lee p/98765432 a/311, Clementi Ave 2, #02-25, 612344 f/Roti Prata f/Ice Milo
dt/20-10-2018 00:00:00
Expected: A new order with the above details is added to the list. The command box should reflect this accordingly with the message "New order added: " + <details of order>. The map should show a new placeholder (or an existing placeholder will increase in size). Timestamp in the status bar is updated. -
Test case:
/order add n/John Lee p/98765432 a/311, Clementi Ave 2, #02-25, 612344 f/Roti Prata f/Ice Milo
dt/21-10-2018 00:00:00
Expected: A new order with the above details is added to the list. The command box should reflect this accordingly with the message "New order added: " + <details of order>. The map should show a new placeholder (or an existing placeholder will increase in size) that gives an approximation of location. Timestamp in the status bar is updated. -
Test case:
/order add n/John Lee p/98765432 a/311, Clementi Ave 2, #02-25, 612344 f/Roti Prata f/Ice Milo
            dt/32-10-2018 00:00:00
Expected: No order is added. Error details shown in the status message (invalid date). Status bar remains the same. -
Test case:
/order add n/John Lee p/98765432 a/311, Clementi Ave 2, #02-25, 612344 dt/32-10-2018 00:00:00
Expected: No order is added. Error details shown in the status message (no food). Status bar remains the same. -
Test case:
/order add n/John Lee n/John Roe p/98765432 a/311, Clementi Ave 2, #02-25, 612344 f/Roti Prata f/Ice
Milo dt/30-10-2018 00:00:05
Expected: A new order with the above details is added to the list. The name is taken as the last name given which is John Roe. The command box should reflect this accordingly with the message "New order added: " + <details of order>. The map should show a new placeholder (or an existing placeholder will increase in size) that gives an approximation of location. Timestamp in the status bar is updated. -
Test case:
/order add n/John Lee n/John Roe p/98765432 a/311, Clementi Ave 2, #02-25, 54612344 f/Roti Prata f/Ice
Milo dt/30-10-2018 00:00:01
Expected: A new order with the above details is added to the list. The command box should reflect this accordingly with the message "New order added: " + <details of order>. The map should show a new placeholder (or an existing placeholder will increase in size) that gives an approximation of location. The location will point to postal code612344as only last six digits are considered. Timestamp in the status bar is updated.
-
-
Prerequisites: An order with name "John Lee", phone "98765432" and date "20-10-2018 00:00:00" already exists
-
Test case:
/order add n/John Lee p/98765432 a/311, Clementi Ave 2, #02-25, 612344 f/Roti Prata f/Ice Milo dt/20-10-2018 00:00:00
Expected: No order is added. Error details shown in the status message (duplicate order). Status bar remains the same.
-
H.5. Selecting order
-
Prerequisites: Logged into the application. There is at least 1 order being displayed in the list.
-
Test case:
/order select 1
Expected: The selected order would be displayed on the display panel. -
Test case:
/order select 0
Expected: No order would be selected and displayed as this is an invalid index.
-
H.6. Finding orders
-
Finding order by phone
-
Prerequisites: Having at least 1 order.
-
Test case: Valid phone without space
Command:/order find p/9111
Expected: Order/s with the phone9111and911122113is shown on the left panel. -
Test case: Valid phones with space
Command:/order find p/1234 9111
Expected: Order/s with the phone9111,911122113,1234,12345678is shown on the left panel. -
Test case: Empty value
Command:/order find p/
Expected: Error is shown in the status message. Value cannot be empty.
-
-
Finding order by address, name, food
-
Prerequisites: Having at least 1 order.
-
Test case: Valid address
Command:/order find a/Blk 10
Expected: Order/s with the address containingBlk 10is shown on the left panel. -
Test case: Valid food
Command:/order find f/Chicken Rice
Expected: Order/s with foodChicken Rice,Chicken Rice with Chilliis shown on the left panel. -
Test case: Valid name
Command:/order find n/Alex Yeoh
Expected: Order/s with nameAlex Yeoh,Alex Yeoh Jinis shown on the left panel.
-
-
Finding order by status
-
Prerequisites: Logged into the application. Having orders in the list with 3 different status
-
Test case: Exact Status
Command:/order find st/PENDING
Expected: Order/s with statusPENDINGis shown on the left panel. -
Test case: Exact status in lower case
Command:/order find st/pending
Expected: Order/s with statusPENDINGis shown on the left panel. -
Test case: Empty status value
Command:/order find st/
Expected: Error is shown in the status message. Value cannot be empty. -
Test case: Invalid status
Command:/order find st/abc
Expected: Error is shown in the status message. Only valid status are allowed.
-
-
Finding order by date
-
Prerequisites: Logged into the application. Having orders added with different dates
-
Test case: Find with one datetime parameter
Command:/order find dt/01-10-2018 10:00:00
Expected: Order/s with the datetime01-10-2018 10:00:00is shown on the left panel. -
Test case: Find with two datetime parameter
Command:/order find dt/01-10-2018 10:00:00 dt/03-10-2018 14:00:00
Expected: Order/s within and on the datetime01-10-2018 10:00:00and03-10-2018 10:00:00is shown on the left panel. -
Test case: Find with more than 2 datetime parameter
Command:/order find dt/01-10-2018 10:00:00 dt/03-10-2018 14:00:00 dt/02-10-2018 10:00:00
Expected: Order/s within and on the datetime01-10-2018 10:00:00and03-10-2018 10:00:00is shown on the left panel. -
Test case: Empty date value
Command:/order find dt/
Expected: Error is shown in the status message. Value cannot be empty. -
Test case: Only date is given. No time is given
Command:/order find dt/01-10-2018
Expected: Error is shown in the status message. Date should follow the formatdd-MM-yyy HH:mm:ss. -
Test case: Invalid datetime is given
Command:/order find dt/57-10-2018 10:00:00
Expected: Error is shown in the status message. Date should be a valid date.
-
-
Finding order with more than 1 argument
-
Prerequisites: Logged into the application. Having at least 1 order
-
Test case: Valid name and status value
Command:/order find n/john st/pending
Expected: Order/s with the namejohnand the statusPENDINGis shown on the left panel. -
Test case: 2 names field are specified.
Command:/order find n/john n/tom
Expected: Only order/s with the nametomis shown on the left panel. Only the last field is taken.
-
H.7. Editing an order
-
Edit an order while all orders are listed
-
Prerequisites: Logged into the application. List all orders using the
/order listcommand. Multiple orders in the list.-
Test case: Valid arguments
Command:/order edit <order_index> f/Roti Canai
Expected: Food of the order with the<order_index>will be overwritten with the foodRoti Canai -
Test case: Invalid order index
Command:/order edit 0 n/alex
Expected: Cannot edit as the order index is a non-zero unsigned integer. -
Other incorrect edit commands to try:
/order edit x f/alex(where x is larger than the list on the left)
Expected: Cannot edit as the order index must be a valid index in the list shown on the left.
-
-
Prerequisites: Logged into the application. There is an order with the name
alex, phone12345678and datetime01-10-2018 10:00:00-
Test case: Edit an order to an existing order in the list
Command:/order edit 1 n/alex p/12345678 dt/01-10-2018 10:00:00
Expected: Cannot edit as an order with the same name, phone and datetime is already in the list of orders.
-
-
Prerequisites: Logged into the application. Have orders that are
OngoingorCompleted-
Test case: Edit an order with status
OngoingorCompleted
Command:/order edit <ongoing_or_completed_order_index> f/tea
Expected: Cannot edit as the order is already assign to a deliveryman.
-
-
H.8. Deleting an order
-
Deleting an order while all order are listed
-
Prerequisites: Logged into the application. List all orders using the
/order listcommand. Multiple orders in the list. The order to be deleted isPendingorCompleted. -
Test case:
/order delete <pending_or_completed_order_index>
Expected: That order is deleted from the list. Details of the deleted order shown in the status message. Timestamp in the status bar is updated. -
Test case:
/order delete 0
Expected: No order is deleted. Error details shown in the status message. Status bar remains the same. -
Other incorrect delete commands to try:
/order delete,/order delete x(where x is larger than the list size) {give more}
Expected: Similar to previous. -
Test case: Logged into the application. Deleting an
Ongoingorder
Command:/order delete o/<ongoing_order_index>Expected: Unable to delete the order because it is already assigned to a deliveryman.
-
H.9. Mark an order as Completed
-
Marking an order as
Completed-
Prerequisites: Logged into the application. Already have an
Ongoingorder.-
Test case: Mark an invalid index as completed
Command:/order done 0
Expected: No order is marked as completed. Index have to a positive integer. -
Test case: Mark an valid index
Ongoingorder as completed
Command:/order done <order_index_of_ongoing_status>
Expected: Order on order list panel is marked asCompletedand deliveryman is updated (Deliveryman total assigned orders will decrease by1or becomeavailable).
-
-
Prerequisites: Logged into the application. Have some
Pendingorders.-
Test case: Mark a valid index as completed but would fail.
Command:/order done <order_index_of_pending_status>
Expected: Fail to mark the order asCompletedbecause onlyongoingstatus can be marked ascompleted.
-
-
Prerequisites: Logged into the application. Have some
Completedorders.-
Test case: Mark a valid index as completed but would fail.
Command:/order done <order_index_of_completed_status>
Expected: Fail to mark the order asCompletedbecause it is alreadycompleted.
-
-
H.10. Assigning orders to a deliveryman
-
Assigning multiple pending orders to a deliveryman
-
Prerequisite: Logged into the application. Have orders that are
Pending, and a deliveryman
Test case: Assigning twoPendingorders to a deliveryman
Command:/assign o/<first_pending_order_index> o/<second_pending_order_index> d/1
Expected: First deliveryman’s assigned order count increases by 2, the two orders change status to becomeOngoing. -
Prerequisite: Logged into the application. Have a deliveryman
Test case: Invalid order or deliveryman index
Command:/assign o/0 d/1,/assign o/1 d/0
Expected: Cannot assign because the order index is not a non-zero unsigned integer. -
Prerequisite: Logged into the application. Have an
OngoingorCompletedorder
Test case: Assigning anOngoingorCompletedorder to a deliveryman
Command:/assign o/<ongoing_or_completed_order_index> d/1
Expected: Cannot assign because that order was already assigned to a deliveryman previously.
-
H.11. Adding deliveryman
-
Prerequisites: Logged into the application. Name "John" has not been used for any existing deliverymen. To check, type
/deliveryman listto see all existing deliverymen.-
Test case:
/deliveryman add n/John
Expected: A new deliveryman named 'John' is added to the list. The command box should reflect this accordingly with the message "New deliveryman added: John". Timestamp in the status bar is updated. -
Test case:
/deliveryman add n/John-Paul
Expected: No deliveryman is added. Error details shown in the status message - non-alphanumeric characters are not allowed. Status bar remains the same.
-
-
Prerequisites: Logged into the application. A deliveryman named "John" exists in the system.
-
Test case:
/deliveryman add n/John
Expected: No deliveryman is added. Error details shown in the status message. Status bar remains the same.
-
H.12. Deleting deliveryman
-
Prerequisites: Logged into the application. There is 1 deliveryman being displayed in the list. This deliveryman must not have any orders assigned to him too. To achieve this, you can filter deliverymen by name, for example, using the default deliverymen, you can try
/deliveryman find n/Chi Kao-
Test case:
/deliveryman delete 0
Expected: No deliveryman would be deleted as the index is invalid. -
Test case:
/deliveryman delete 2
Expected: No deliveryman would be deleted as the index is invalid. -
Test case:
/deliveryman delete 1
Expected: The deliveryman displayed will be deleted.
-
-
Prerequisites: Logged into the application. There is 1 deliveryman being displayed in the list. This deliveryman has an order assigned to him. To achieve this, you can filter deliveryman by name, then assign him a
Pendingorder, for example/assign o/1 d/1.-
Test case:
/deliveryman delete 1
Expected: Deliveryman would not be deleted as you are not allowed to delete deliveryman with orders assigned.
-
H.13. Selecting deliveryman
-
Prerequisites: Logged into the application. There is at least 1 deliveryman being displayed in the list.
-
Test case:
/deliveryman select 1
Expected: The selected deliveryman would be displayed on the display panel. -
Test case:
/deliveryman select 0
Expected: No deliveryman would be selected and displayed as this is an invalid index.
-
H.14. Finding deliveryman
-
Prerequisite: Logged into the application. Having at least one deliveryman.
-
Test case:
/deliveryman find n/tom
Expected: Deliveryman with the nametom,tommy,tom hankswould be displayed on the display panel. -
Test case:
/deliveryman find n/tom n/john
Expected: Deliveryman with the namejohn,johnny,john doewould be displayed on the display panel. Only the last field is taken. -
Test case:
/deliveryman find n/
Expected: Error is shown in the status message. Value cannot be empty.
-